Vogue 8322 review

Friday March 20, 2020

One of the garments in my Fall/Winter sewing plans is a navy blouse. I was going to use a pattern I’ve made several times before, Vogue 8772, a fitted button-up with collar & collar stand. But when I was cleaning up my sewing space, I discovered a forgotten half-done toile for a button-up with a v-neck and one-piece (camp) collar. I tried to remember why I had abandoned it — and tried it on to see how it fit.

The pattern is described on the package as a long sleeve, princess seam shirt with straight or stylized front hem. View A: snap front closure, topstitched along front opening and neck edges. View B: pointed collar variation, buttoned cuff. View C: front button closure. View C: standing collar, flared sleeve. Here’s the pattern, and my toile was for view B. ( Here are the reviews on pattern review.)

I tried on the toile and saw that although I’d cut my usual Vogue pattern size (12), the chest was much too big across the front and the shoulders were too wide. I fiddled with the princess seams until I got that sorted out, took the blouse apart and made the pattern changes.

Then I cut out the pattern in my fashion fabric — a blue silk noil. It’s a pretty straight-forward sew. The collar is one piece, which is much easier than one with a collar stand, so the tricky bits were setting the sleeves and the button holes. On the front there’s a facing from center front to the princess seam which is hand-sewn to the seam allowance. That might have been the hardest part, getting the sewing smooth in that area. I clipped the seam allowance and cut it down to about 1/4″, but it still has a bit of wiggle in the seam just above my bust.

My big mistake was putting the button holes on the wrong side, but I doubt anyone but me will notice.

The V is a bit low, and if I was to make the blouse again I would figure out how to raise it up and inch or so.

My husband took several pictures, but this was the only one in focus, as I tried to get my hair to stay out of my face.

Seamwork Elmira Wrap Sweater

Wednesday January 8, 2020

As part of my Fall/Winter sewing plans, I wanted to make a layer that wasn’t a standard button up cardigan. I have the Seamwork Elmira ballet wrap top pattern and decided to give it a try. The Elmira is a cropped, fitted ballet wrap with 3/4 sleeves and long ties. Two examples that got me interested in trying the pattern are Meg at Cookin’ & Craftin’ and Sewrendipity’s on instagram. You can see lots more examples on Instagram here.

I haven’t had much luck with Seamwork patterns in the past. Both woven pieces I attempted required a lot of fitting changes and I gave up on them. But this is a knit, so I thought it might be more forgiving. Most blog posts I read about the pattern didn’t mention fit issues, but before I cut into my expensive wool jersey, I tried out the pattern with some left-over ITY in my stash.

I made a few changes before I cut my fabric:
1) Lengthened it 2″ as it seemed awfully short
2) Lengthened the sleeves 2″
3) Shortened the ties.
4) The front of the wrap is 2 layers but the back is only one. The back neckline is just folded and stitched. Lots of other bloggers complained about this, so I made the back 2 layers as well.

Once I had the pieces cut out, I used some lightweight fusible interfacing on the shoulders and neckline so they wouldn’t stretch out.

The instructions were good and the construction straight-forward. I did most of the sewing on my serger.

Here’s the picture Seamwork uses to show off the Elmira. Mine looks very similar (except for the long ties), but if I was to make this again, I would go up a size, to to get more front coverage, like Meg does here.

Looking at all the Instagram examples, I think the wrap looks best over a dress. I’ve tried it with my turtleneck tucked and out, and I prefer the shirt out.


Seamwork Elmira wrap top, True Bias Nikko turtleneck, self-drafted pants

I’m glad I made this up in the ITY before committing to my plan of making it in my merino jersey. I’d rather have something a bit longer. Here are 2 other patterns I’m considering: the Cashmerette Appletop wrap top hack (below left) or the Trish Newbery wrap cardigan (below right).

Jalie Charlie Bomber Jacket

Wednesday January 1, 2020

Last spring I realized I needed a light-weight jacket to wear on my daily walk. I quickly decided to make Jalie’s Charlie Bomber Jacket, an unlined jacket with a zipper front, welt pockets and ribbing at the collar, cuff and waistband. The first one I made is a bit oversized and the sleeves are too long, but it’s perfect for its intended purpose. This fall, I made another one out of a quilted knit (above), as part of my fall/winter sewing plans. This one is meant for colder weather — it’s lined with micro-fleece. There’s a close-up below.

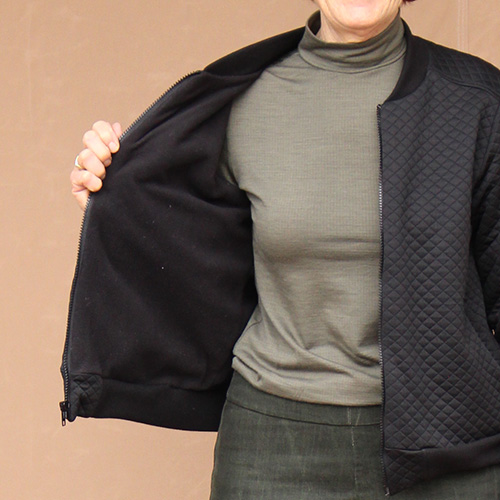
The Charlie Bomber is one of those patterns that looks more complicated that it is — I’m an “adventurous beginner” when it comes to garment sewing, and this was easy to construct, especially with their video tutorial. I’m glad I made the unlined version first — although the collar-to-zipper connection is pretty dodgy — it made the lined (& bagged) version easier to understand. There’s a Jalie blog post on lining the jacket here.

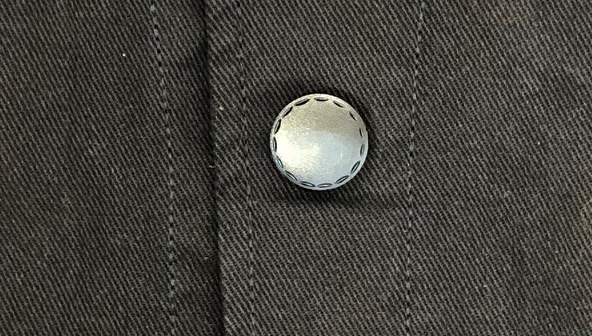
My only complaint about the pattern isn’t about the pattern itself or the instructions — it’s about the ribbing requirement. The pattern says you need 1/3 of a yard — but ribbing (especially the striped / multicolored ones) doesn’t come that way. It’s sold in strips. And I discovered the strips really aren’t long enough and need to be pieced (for an adult jacket). I guessed on my first ribbing order and bought 2 strips — not quite enough for the waistband, collar and cuffs — and I should have ordered 3. And you might ask, as I did, what width strip should be… you have to read the pattern to figure out it’s 6 inches.

Botani seems to sell the widest variety ribbing in the US (online, anyway). But as I looked at their offerings, I was baffled about what weight and fabric composition I should get for the solid black ribbing I was after. I own a ready-to-wear jacket with ribbing that is thick, soft and seems like a natural fiber — could I find something like that? Ah the problem of living in a city that has only a JoAnn! In the end I ordered several different kinds of ribbing from Botani, and when they arrived, used this cotton one.

Some notes about the pockets. First, the welt is formed from the pocket pouch fabric. So while I would have liked the inside of the pocket to be my fleece lining, it’s the not-so-cozy outer fabric. Second, while my iphone fits in the pocket, it doesn’t feel very secure as the pocket isn’t very deep. If I make another one, I would include an interior pocket in the lining.

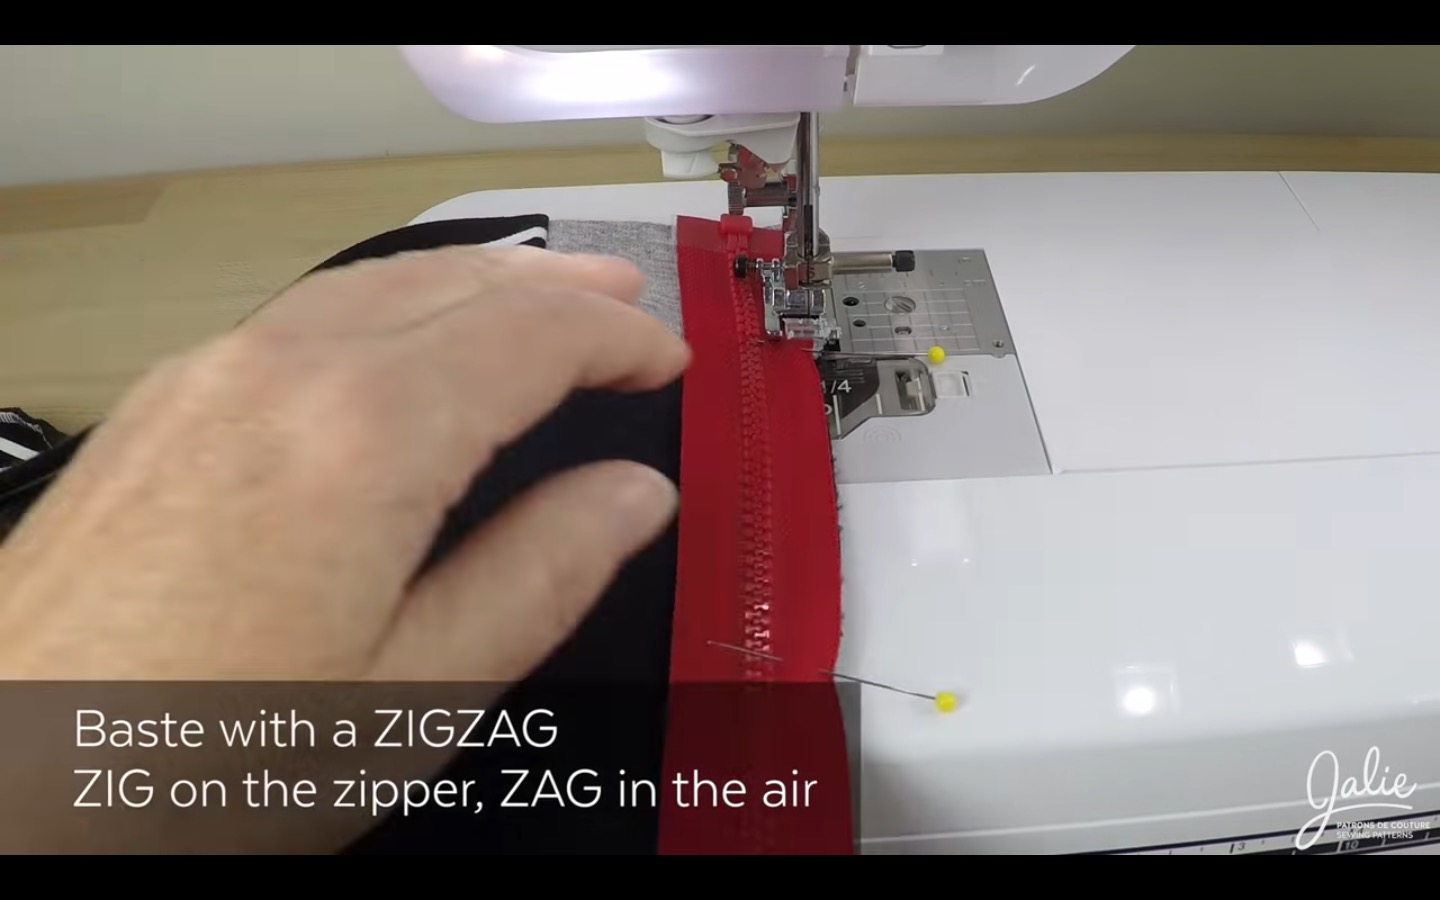
I also got a very useful tip from the video tutorial. She has you baste the zipper to the jacket using a wide zig zag stitch at the edge, with part of the stitch on the fabric and a little off. I’ve since used this method to baste together the folded collar for a turtleneck before attaching it to the neckline. It effectively makes the collar one layer. Here’s a snap from the video showing what I mean:

My review:

Pattern Description: Bomber jacket for stable knits or stretch woven. Zippered front. Ribbing collar, cuffs and waistband. Welt pockets with the welt forming from the pocket pouch fabric. Forward shoulder seam.

Pattern Sizing: Jalie sizing, 27 sizes included, from 2 yr toddlers to women size 22.

Did it look like the photo/drawing on the pattern envelope once you were done sewing with it? Yes.

Were the instructions easy to follow? Yes, especially with the video tutorial. This was my first welt pocket and separating zipper installation, and I didn’t have any problems. I liked the new-to-me basting method for knit fabrics from the video.

What did you particularly like or dislike about the pattern? Mostly likes. I would like deeper pockets, and I thought the info about ribbing was lacking (see above).

Fabric Used: Pre-quilted black stable knit for the body, micro-fleece for the body lining, and a rayon lining with a bit of stretch for the arms. (I thought it would be hard to get my arms into the sleeves with fleece.)

Pattern alterations or any design changes you made: I added a hang loop on inside back. I took 2 inches off the body and 1-1/2″ off the sleeves.

Would you sew it again? Would you recommend it to others? Yes and yes. If I make another one I would add an inside pocket for my phone. Also, I’d change the collar from ribbing to a standing collar for added warmth. This Pattern Review review talks about how she changed the collar to do just that.

Fall-Winter Sewing Plans

Thursday November 21, 2019

Since I started garment sewing in the fall of 2017, I’ve tried unsuccessfully to put together a seasonal sewing plan. I tried the Seamwork “Design your wardrobe” online course. I tried the yearly Make Nine challenge. I drew sketches and made lists. But in the end I couldn’t decide on a list or plan, much less stick to it. Ultimately I suspect I wasn’t ready to commit to a plan, as I wasn’t confident of my sewing abilities. But this fall I realized I actually had a plan, I just hadn’t articulated it. I looked at the fabric I bought recently and saw lots of olive green. I’ve been trying to make coordinating pieces that mix and match, and I noticed that the sketches I drew were of complete outfits — bottom, top, top layer and jacket/coat.

I wondered if I could combine those outfits into a plan or a mini capsule wardrobe. As someone who loves puzzles, I returned to something I’d tried before but abandoned — a wardrobe sudoku. The idea is to create a “sudoku” board of 4 rows and 4 columns with each row containing one top, bottom, accessory, and shoes to create an outfit. You end up with 10 outfits using 16 pieces (reading the rows, columns and 2 diagonals). Pattern Review had a sudoku contest and you can see what people made here. And here’s an explanation of how the sudoku wardrobe works.

In fall, winter and spring, I wear a top, a cardigan, a bottom, and, on errands and my afternoon walk, a jacket or coat. I don’t wear many accessories — jewelry or scarves, and my shoes are boring — sneakers when there is no snow and boots when there is. Since I’m interested in making/sewing, I decided on 4 categories I could make: top, bottom, top layer and jacket.

I knew that sewing 16 items wasn’t realistic for me, plus I wanted to make the outfits work with things that are already in my closet. So I picked 8 things to make, and 8 things I had already made or bought. I also wanted to pick both patterns I’ve made before as well as a few I haven’t, and to vary the complexity — easy knit tops and more time consuming button ups and coats. Here’s the grid, and below a list of the items. The cells in the grid with the yellow-ish background are things I’ve already made or bought.

Tops:

  1. True Bias Nikko Turtleneck in olive wool jersey. I’ve made this top several times, so no fitting necessary. And a quick sew!
  2. Vogue 8772 button up in green/black plaid flannel. I made this shirt last year and wear it often with black jeans, but would like to have it work with other things in my closet
  3. True Bias Nikko Turtleneck in black/grey stripe wool jersey. I made this one earlier this fall.
  4. Vogue 8772 button up in navy. Since I’ve already made this pattern multiple times, there’s no fitting. But it is time consuming with collar and button & sleeve plackets (not to mention getting the sleeve head to fit nicely!)

Bottoms:

  1. Vogue 9181 pants in olive green stretch twill: I haven’t had a lot of luck fitting pants — the back on the patterns I’ve attempted are a mass of wrinkles. But this pattern has 3 backs — so I’m hoping the curvy one will be more successful.
  2. Vogue 9181 pants in a stretch denim: see above.
  3. Self-drafted cropped black culottes. I took a pants fitting class last year, and these are the results — they are comfortable and since they are cropped they stay out of the snow when I run errands!
  4. Ready to wear midi wrap skirt in loden (dullish grey green). I really like this skirt but don’t wear it enough.

Layers:

  1. Ready to wear cropped navy cardigan.
  2. Itch to Stitch Lisbon Cardigan in olive wool jersey. I’ve made this sweater before, so no fitting required, and mostly sewn on my serger (well, there are button holes!)
  3. Seamwork Elmira wrap cardigan in black jersey. I’d like to have a few layers that aren’t standard button up cardigans. This is a new pattern for me.
  4. Ready to wear cropped animal print grey/black cardigan. I’m not sure this goes with the other things in my grid, but I don’t wear this enough so thought I would give it a boost.

Jackets:

  1. Paola workwear jacket in navy denim. Made this fall — blog post here.
  2. Jalie Charlie Bomber Jacket in quilted black ponte, made earlier this year. Blog post coming.
  3. Mccall’s 6531 anorak in olive green twill with red zipper: This anorak is the most involved make on my list. It’s unlined, but realized after getting all the materials together that I really need a warmer jacket. So I’ll be lining this one.
  4. Hey June Evergreen Moto Jacket in olive green sweater knit. This is a new pattern for me.

First up is the Seamwork Elmira wrap top. Do you have sewing plans for this fall/winter?

Paola workwear jacket pattern review

Tuesday October 29, 2019

On my sewing list this fall is a navy jacket that I can use for layering. I wanted a utility-type jacket and decided to use a free pattern from the Fabrics Store, the Paola Workwear Jacket. It’s described as “featuring a straight boxy fit, four large patch pockets and flat-felled seams for sturdiness.” Here’s the technical drawing

Paola Workwear Jacket Tech Drawing

You can see other sewists’ makes of the jacket on instagram

I knew I was going to crop the jacket, so I made a muslin to check the length and the pocket placement. I made up a small based on the finished measurements (I’m 35 bust, 29 waist). After taking 5 inches off the bottom of my muslin, the 2 vertical pockets weren’t going to work — not enough space. So I drafted a larger pocket that would hold my phone. The other alteration I made was to add a seam down the back for a bit more interest.

I bought a dark navy brushed denim from Blackbird Fabrics, as well as an edge stitch foot for my sewing machine, to help with the double stitching on the pockets. I’ve not made jeans or done much top stitching, so I did some experiments before getting started. Coincidentally I read a post from Claire about making a denim jacket and she recommended hammering down the flat-felled seams before top stitching. This tip made my job much easier! On Instagram, someone mentioned she top stitches with a triple stitch and regular thread. I liked my experiments with that method — it made the top stitching, which matched the color of the jacket, stand out more than using top stitching thread. If I was using a contrasting color, my experiments told me to use a thread that matches the jacket in the bobbin and the contrast for the top color. This made the stitches stand out a lot more than using the contrast in the bobbin.

The instructions are spare but good, although the pattern pieces don’t mention cutting interfacing for the facings and collar, but the instructions assume you’ve cut & applied them.

Here’s my jacket in action:

I’m pleased with the buttons I found on ebay — they are navy with a what looks like top stitching around the edge.

One more picture: