Vogue 9187

Saturday October 17, 2020

Vogue 9187

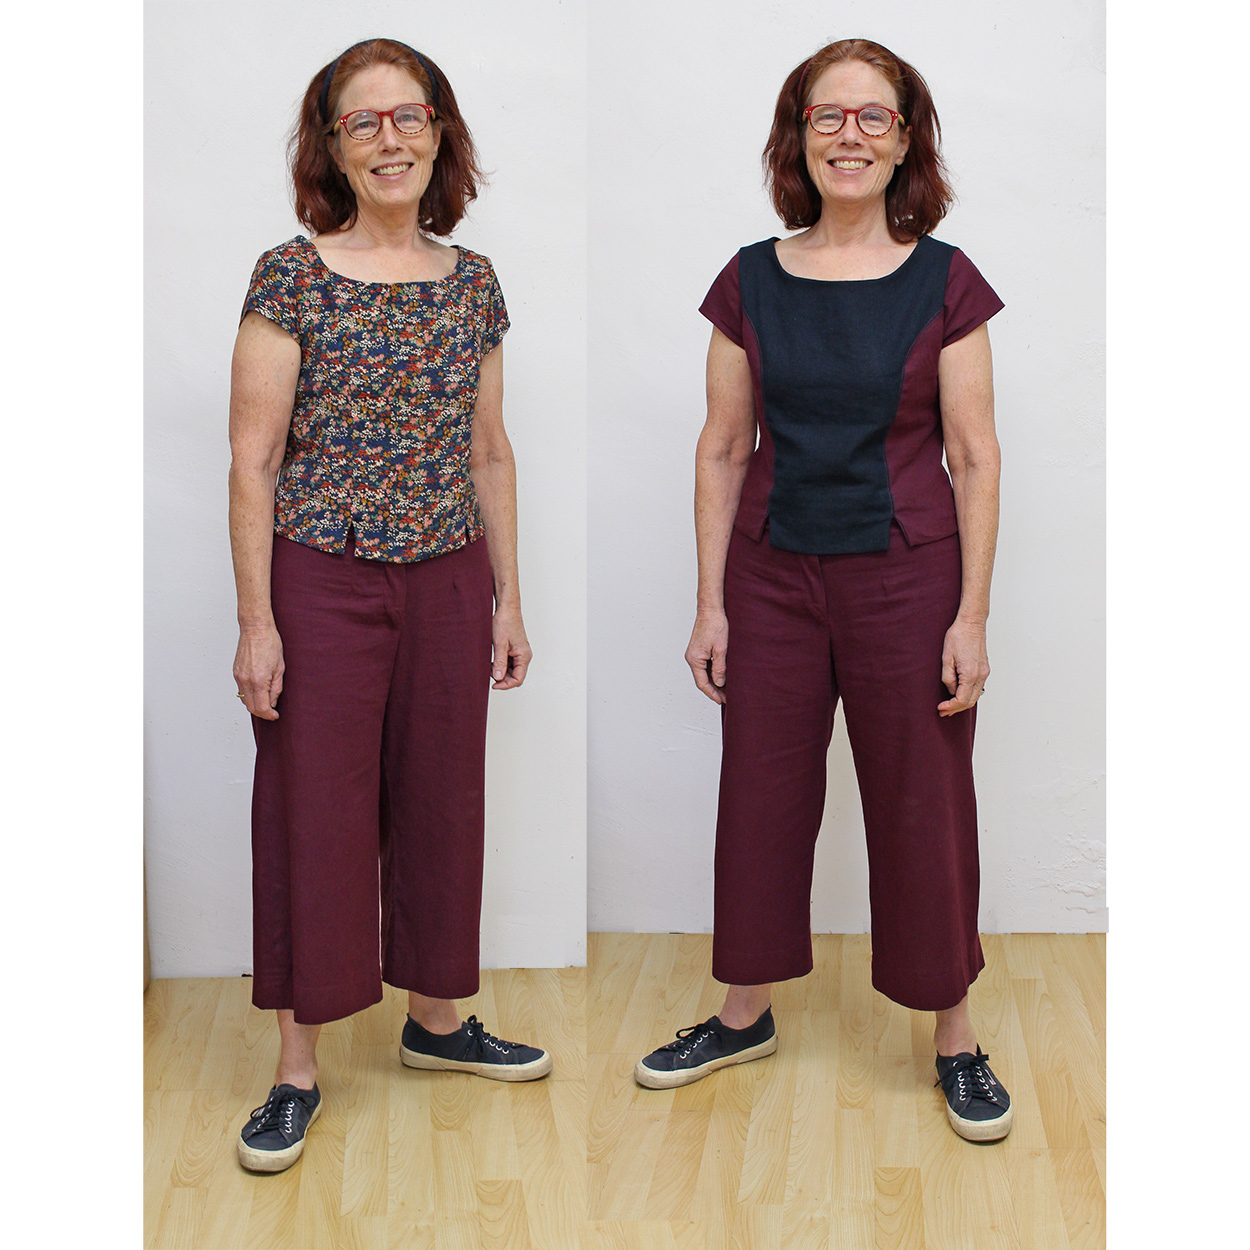
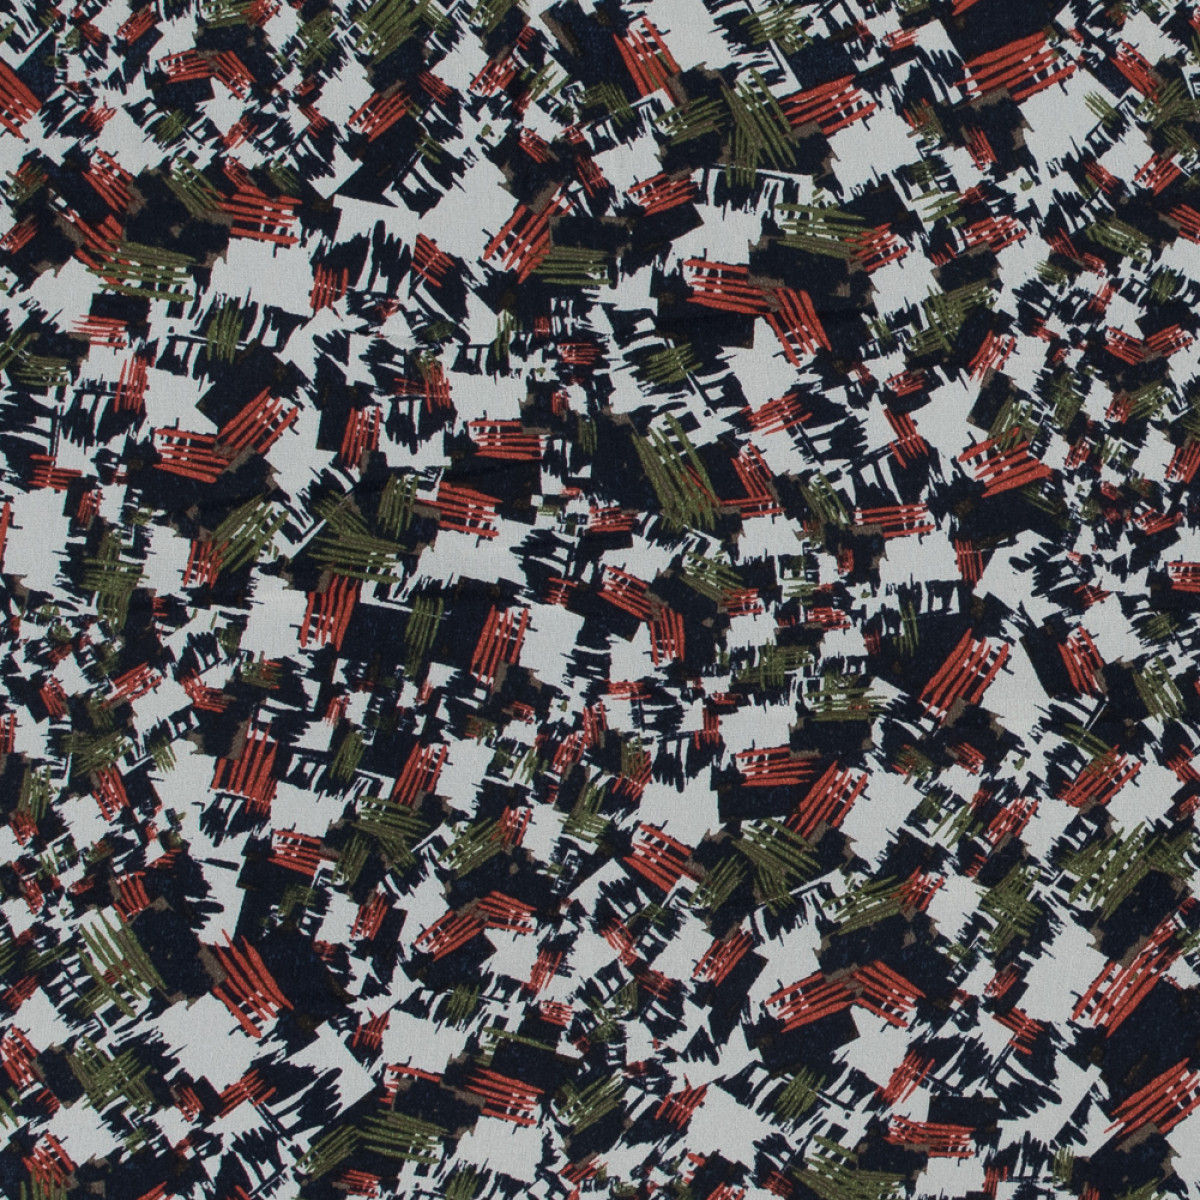
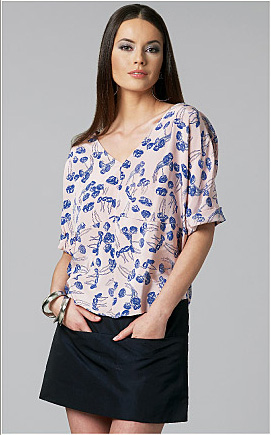
This top is part of my Work from Home Module. On the right is my wearable test fit, and the left is the fabric I selected for the module.

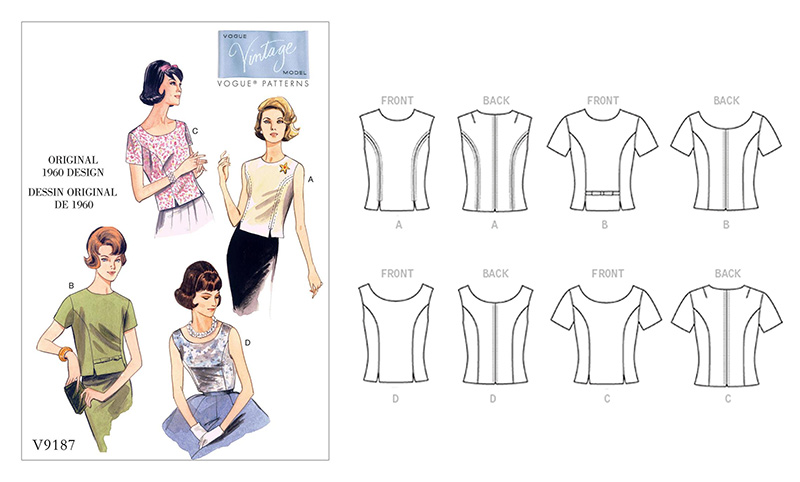
The pattern is described as a “top (close-fitting through bust) with neckline variations, side-front and side-back princess seams, front hemline slits, and back zipper”. I would add it has neck facings and a quite large hem facing. It’s a re-issue of a 1960 pattern. Here’s the envelope & line drawings.

Vogue 9187 pattern envelope

I made view D and added the sleeves, in size 12 at the shoulders, grading to 14 just below the bust (I’m 35″, 29″, 40″). I knew that with a separating zipper in the back, I would never wear the top — getting the zipper started and zipped up by myself would be impossible. Instead I cut the back piece on the fold, intending to put an invisible zipper in the side seam. But the top fits over my head just fine without the zip, and with no zipper, this is a very easy sew. I suspect this wouldn’t be the case for the other views with the narrower neckline.

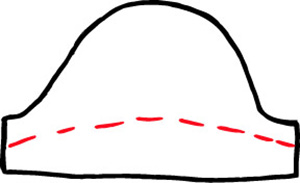
The other alteration I made was to the sleeves. I don’t like the length, so I made them more of a cap sleeves. I found this post useful in figuring out how to change the sleeve pattern piece. Here’s a very rough sketch of sleeve, with my change marked in red.

For my test fit, I used some leftover linen. I made 2 alterations: I’m really an A cup and the top is drafted for a B, so I took the princess seams in. Second there was too much fabric above my bust, so I took the shoulder seams up about 1/2″. The top is quite cropped. I usually shorten most patterns by about 2″ (I’m 5’3″) but this didn’t need to be shortened. If you’re taller than me, you might want to check the length.

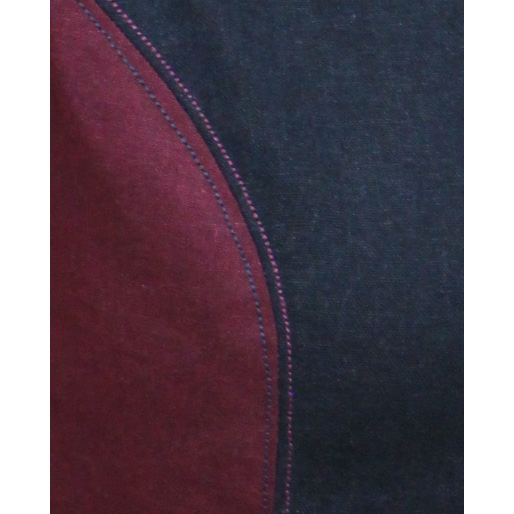
I was so pleased with it after I got it basted, I decided to finish it and practice my top stitching. Here’s a close-up of the top stitching:

top stitching on vogue 9187

For my Work from Home Module blouse, I used a rayon crepe. I only had 1 meter, but had no trouble getting the pattern to fit.

Two design details I really like about this top are the back neckline and the hem detail:

vogue 9187 details

But maybe the best thing is that they both coordinate with the purple pants I made this summer!

Tessuti Evie Bias Skirt

Thursday October 1, 2020


For the work from home module wardrobe sew-along challenge, I planned to make the Tessuti Evie Bias Skirt. But I decided to make a test garment first, to check the size and fit. I’ve had a 2 yard piece of rayon poplin in an olive green with pink/beige dots from Workroom Social in my stash for several years. The color and print are right up my alley, but while I’ve considered it for multiple projects, it never seemed quite right. But this year I’m determined to find uses for the orphan fabric in my stash, so it got drafted for the Evie test fit.

Little did I know how much fun this would be to sew, all the new things I got to try and how happy I am with the finished skirt!

The Evie is described as a “floaty and flared midi-length bias skirt pattern and includes two versions. View A is finished with a bound waistline and side zipper opening and View B is a pull-on version with scalloped elasticised waist.” You can see Instagram examples here and at the bottom of the post I’ve listed several blog reviews that I found helpful.

The pattern is very simple, with the same piece used for both the front and back. However, the PDF includes only 1/2 the piece, you have to make a tracing to get the entire front (or back). I made a size 8 at the waist, grading out to a 10 at my hips. I’m w: 29″, h: 40″, and 5’3″.

I decided to make view A, with the zipper, as my local Joann didn’t have the needed 5/8″ elastic (but they had lots of invisible zippers). But I also didn’t have enough fabric to cut the very long bias cut waistband piece that view A called for. While I procrastinated on what to do, I asked Google about sewing bias cut skirts. I found a Mimi G sew-along for Mccall’s 7931, a very similar pattern. That pattern has a facing, not a waistband, and Mimi G used a 1″ wide strip of grosgrain ribbon instead of the facing. Problem solved! I happened to have a piece of matching (beige) 1″ grosgrain ribbon that I could use to finish the top of the skirt rather than the waistband called for in the pattern.

Mimi G’s video has some tips for working with bias cut fabric — don’t handle the fabric or let it drape over the edge of the work surface or it will stretch out. Serge the side seams before doing anything else (sort of like stay stitching). And sew both side seams of the skirt from bottom to top.

I also found another helpful youtube video: Professor Pincusion’s How to Cut and Sew on the Bias. She suggests using a narrow zigzag stitch on the seams to add in some stretch. But she also has a lot to say about pattern layout. She says that fabric has 2 biases — perpendicular to each other. And it’s important to have the front of the skirt on one bias and the back on the other.

The Tessuti pattern doesn’t have a layout diagram, but does have both grainlines indicated on the pattern. So as not to get confused, I drew the grainlines in different colors, and wrote “Use for front skirt piece” and “Use for back skirt piece” on the pattern.
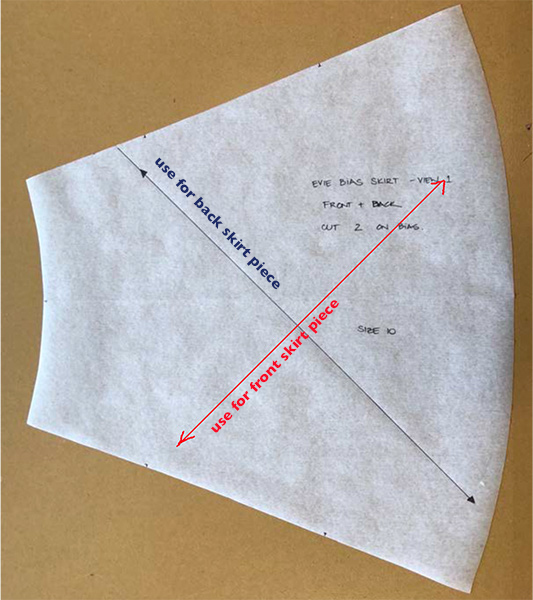
Bias markings on pattern

The pattern calls for using a tear-away interfacing for both the waist and the seam where the invisible zipper is inserted. That interfacing isn’t available in the US, and Professor Pincusion recommended iron-in lightweight tricot, so that’s what I used.

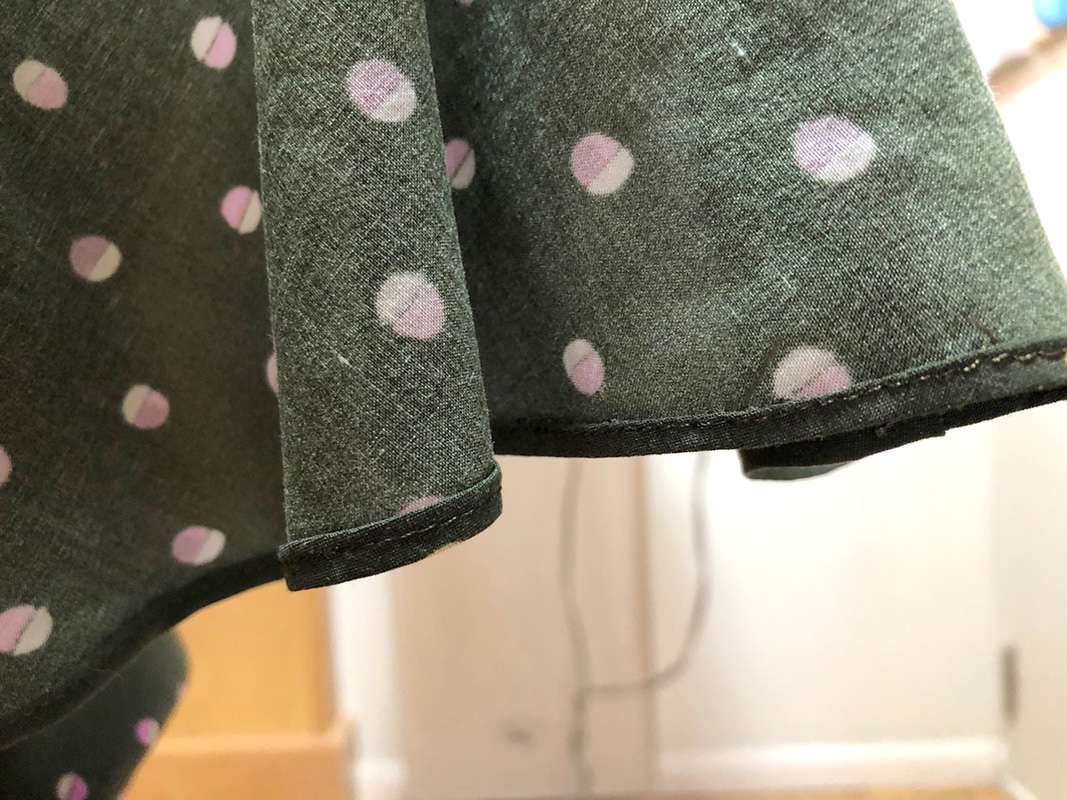
I thought the skirt was a bit short when I was done, so I wanted to make the smallest baby hem I could. Enter the Ban-rol waistband stabilizer. I got some from Style Maker Fabrics. They say Ban-rol can be used “as a stabilizer and guide for sewing tiny rolled hems on even the most difficult fabrics, like rayons, sheer, and more.” It made the job so much easier!

This video does a much better just than I can of explaining how to use the stabilizer, but here’s a picture of my first test. You sew the stabilizer to the edge of the front of the fabric, then turn the stabilizer to the back, sew the hem in place, pull out the stabilizer and you’re done.
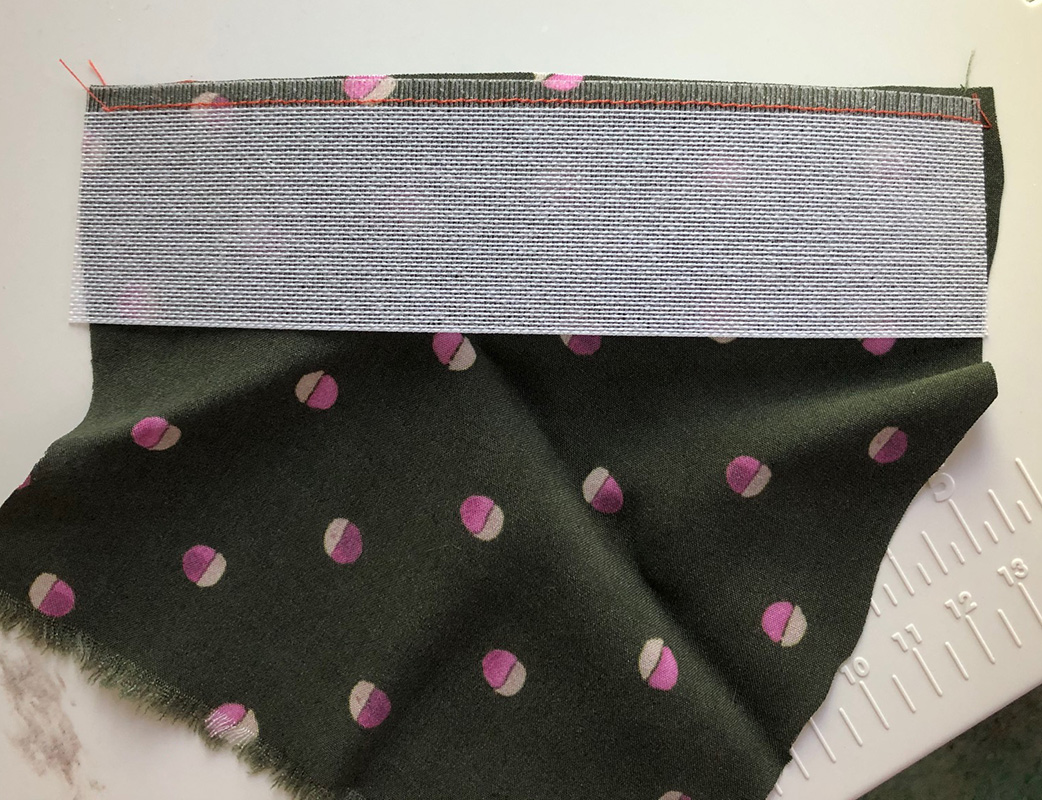
It was surprisingly easy, although slightly awkward hemming a wide skirt, as you need a piece of ban-rol that is as long as the hem. And here’s my tiny hem.
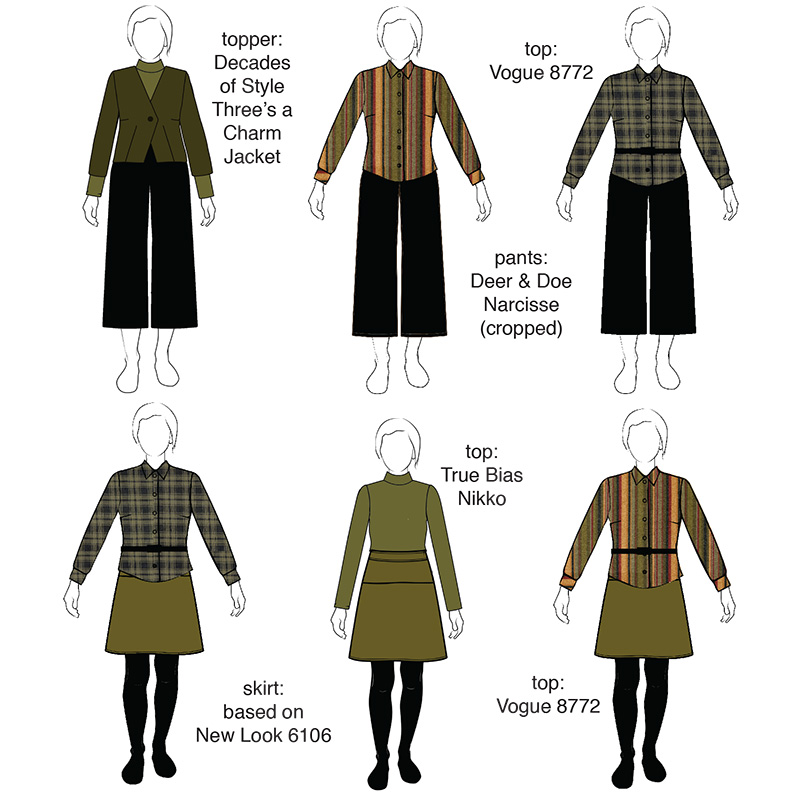
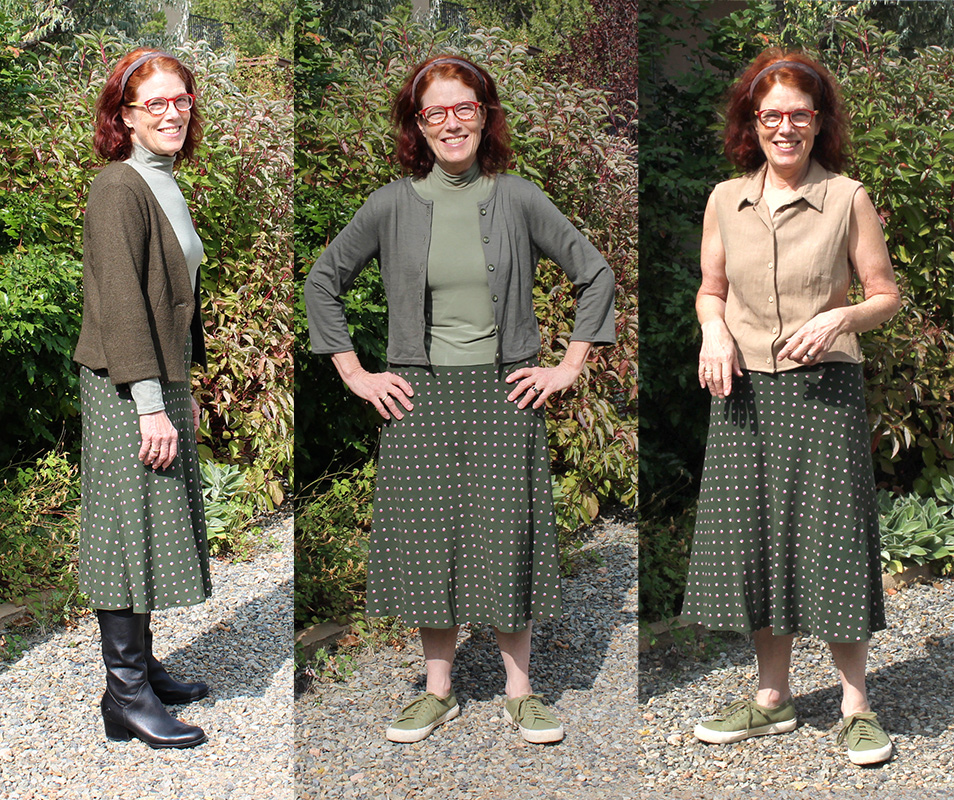
Turns out I have lots of tops and toppers to wear with my new skirt, all year round.


for winter: True Bias Nikko turtleneck and Decades of Style 3’s a Charm jacket
for fall and spring: True Bias Nikko turtleneck & self-drafted cardigan;
for summer: cropped V8772
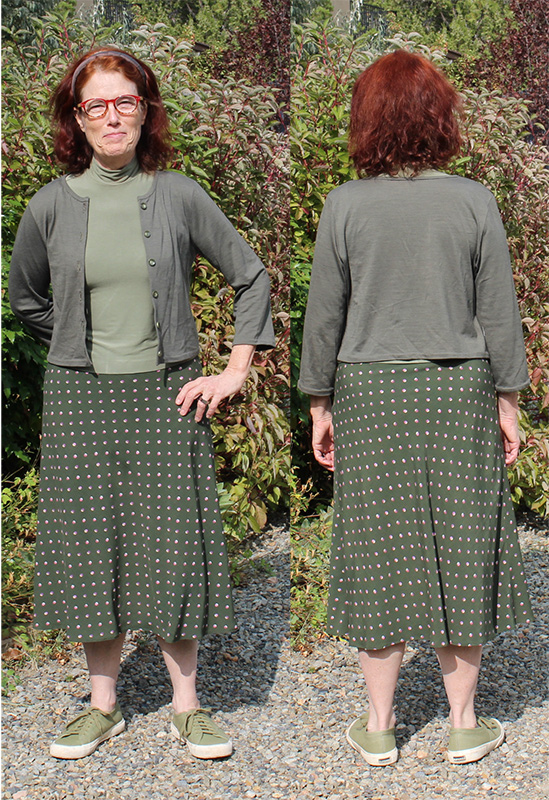
front and back

Resources

Tessuti Evie Bias Skirt pattern

Evie on Instagram

Helpful blog posts: Fiona (Diary of a Chainstitcher), Hollydolly

Mimi G bias skirt sew-along

Professor Pincusion’s How to Cut and Sew on the Bias

Instructions for doing a baby hem with Ban-roll waistband stabilizer, which is available from Style Maker Fabrics
Helen’s Closet Patterns Gilbert Top

Monday September 21, 2020

2 Gilbert Tops

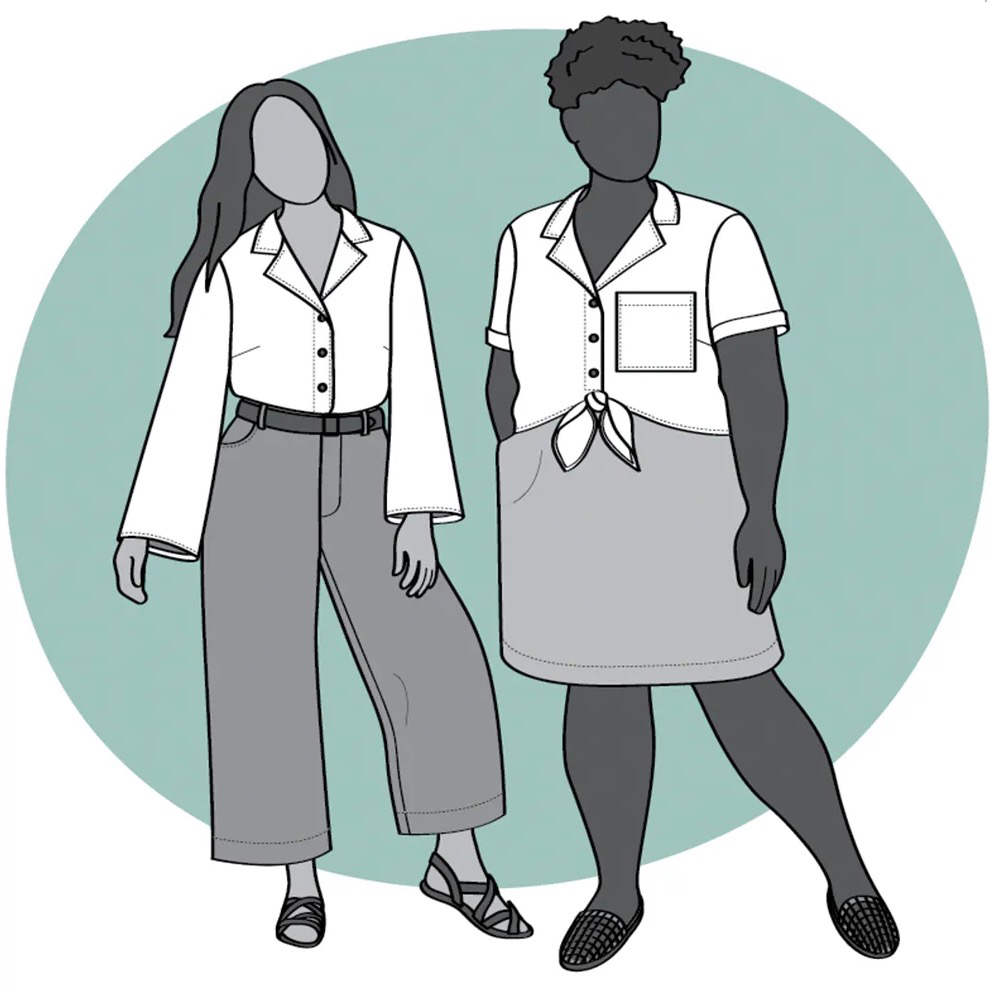
I’ve been wanting to add a tie front button up top to my wardrobe, and when Helen’s Closet Patterns announced their Gilbert Top, it seemed like a good pattern to try. It’s described as “a button up shirt with a camp-style collar and a relaxed fit. View A has short sleeves and a tie-front. It is slightly cropped but still very comfortable with mid to high-rise bottoms. View B has long bell sleeves and a longer length, perfect for tucking into high-waisted pants.” Here’s the drawings (view B on the left, view A on the right):

Helen's Closet Patterns Gilbert Top

I hesitated because the sleeves didn’t look like they would fit under my cardigans, and I’m trying to make a wardrobe that I can wear year round. But very quickly after the pattern release, Helen posted a hack to make a sleeveless shirt and I was sold.

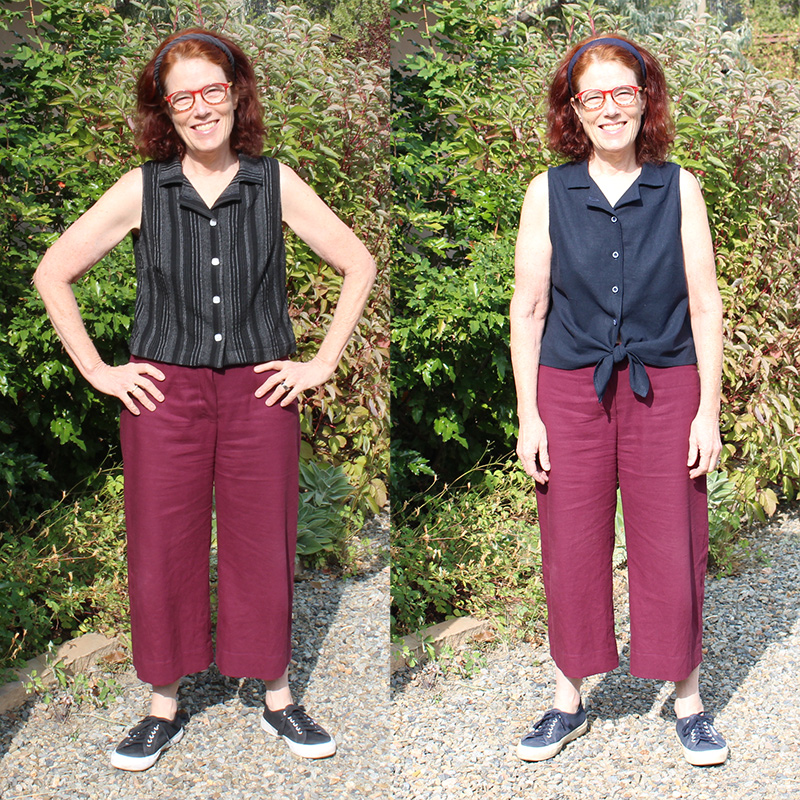
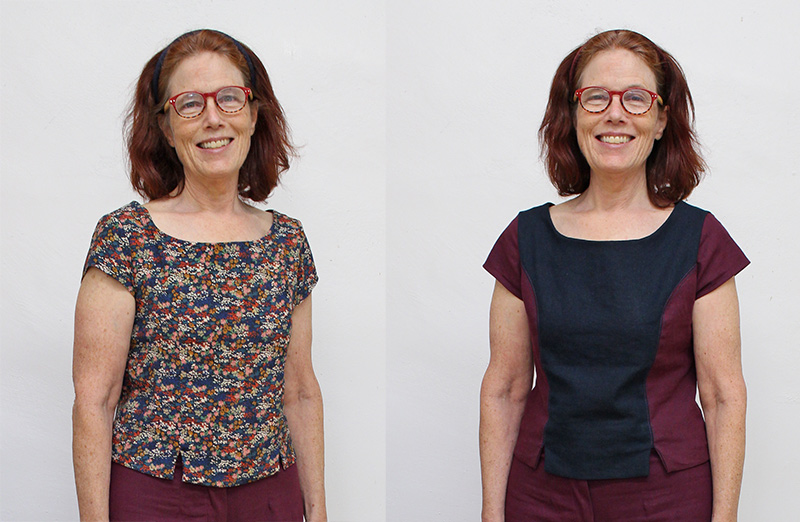
I’ve now made the top twice, once with the tie and once without. In the photo at the top of the post, the one on the left is a polyester viscose woven and the navy on the right is Kaufman Brussels Washer Linen Blend.

The instructions are thorough and the illustrations good, and both tops went together without a hitch. There are a number of steps to alter the pattern to make it sleeveless, but Helen’s instructions carefully walk you through what you need to do. Because there were so many alterations, I made a mock-up before cutting into my good fabric.

From the size chart, I would have made a size 6 (I’m B:35 W:29 H:40, 5’3″ tall). But Helen suggested sizing down for a more fitted shirt for the sleeveless version, so I made a size 4 after doing some flat pattern measurements and comparing the pattern to other button-ups I’ve made.

My pattern alterations:

  1. Brought in the shoulder seam 3/4″
  2. Altered the angle of the shoulder seam 1/4″
  3. Helen suggests shaping the armscye edge of the shirt back, and I used her measurements, but in my muslin/test garment, I found I had to shape a bit more (a total of almost 1/2″) to deal with my pointy shoulder blades
  4. She also suggests raising the armscye, which I tried, but in my muslin found I had to take the extra fabric out.
  5. Raised the bust dart 1/2″
  6. In my muslin, I found the first button too low. Also I wanted to be able to button the shirt all the way to the top, so I used 5 buttons rather than 3. If I made the tie version again, I’d have to figure out what to do with the bottom button, it’s too close to the ties, as you can see in the photo at the top.
  7. The pattern is drafted for someone 5’6″. For the tied top, I didn’t shorted the top. For the black/grey stripe, I did a 1-1/4″ hem rather than a 5/8″ hem.

I’m really pleased with my tops. They will both get a lot of wear. And I have earmarked some more fabric for another one with the tie front.

Work From Home Module Sew-along Plans

Thursday September 17, 2020

This past winter I really enjoyed planning and sewing for “the great module sew along” challenge on Instagram. The challenge was to sew a small capsule wardrobe of 3 tops, 2 bottoms and a topper in 6 weeks. You can see my plans here and the clothes I made here.

Whitney (TomKatStitchery on youtube and @tomkatstitcherycarmel on instagram) is hosting another challenge this fall, with the theme “Work from Home”. You can see what others are making on Instagram with the hashtag #wfhmodulesewalong.

While the theme is perfect for the pandemic and everyone staying home, I’ve worked out of my house most of my career, and even though I could wear pajamas all day, I’ve found that I’m much happier and productive if I dress in the morning as if I’m going to meet someone for lunch or coffee. I’ve been trying to build a wardrobe that I can wear most of the year — sleeveless tops for summer that I can layer with a cardigan or light jacket in spring & fall. Skirts and cropped pants that I can wear either barelegged or with tights & boots. So my plans look a bit summery, even though this is autumn sewing. But I have several cardigans, jackets and scarves to coordinate with my selections that will take me, hopefully, through winter.

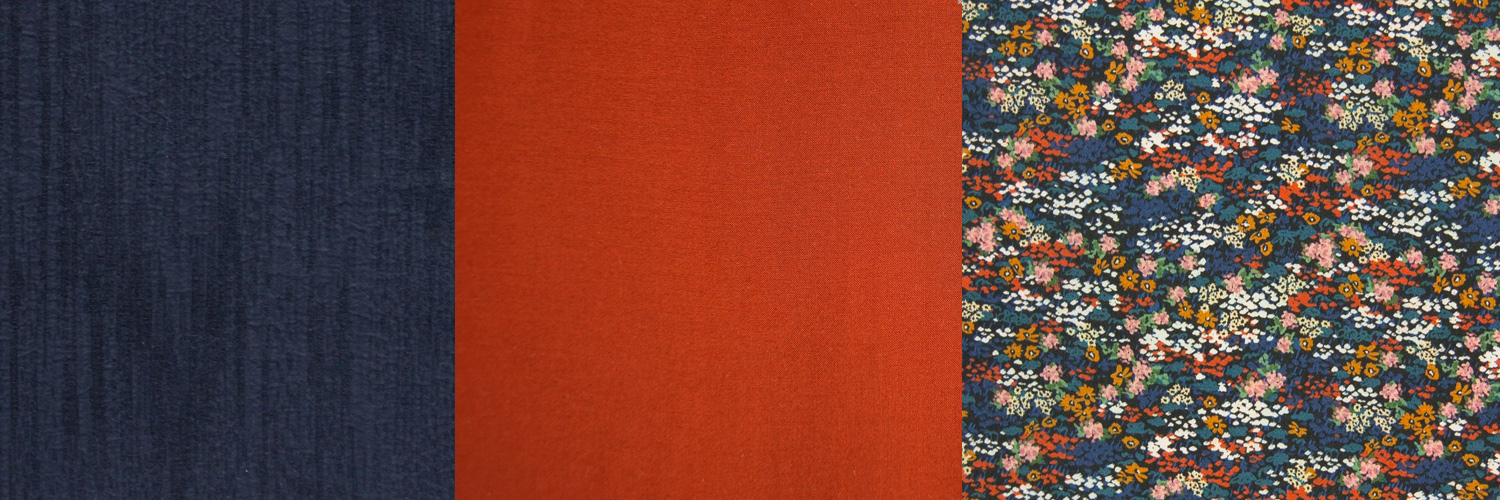
For the winter/spring challenge, my color palette was olive and black. For this one, I’m going to use rust and navy:

work from home sewing challenge color palette

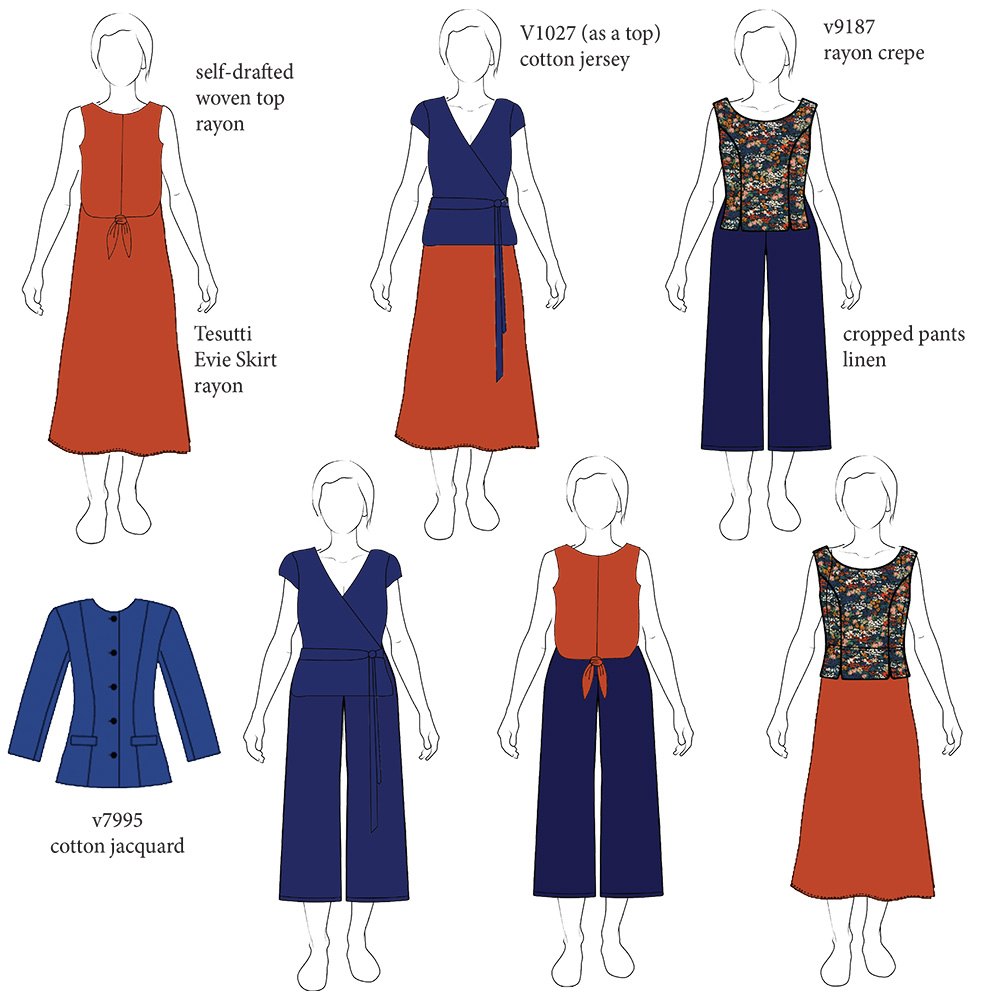
Here’s my sewing plan:

  1. Top #1: self-drafted woven tank with a tie in rust-colored rayon.
  2. Top #2: Vogue 1027 wrap top (the pattern is for a dress, but I’m cropping it at my hip) in a cotton jersey
  3. Top #3: Vogue 9187 in a print rayon crepe
  4. Bottom #1: Tesutti Evie bias cut skirt in the same rust colored rayon as the first top
  5. Bottom #2: self-drafted cropped pants/culottes in navy linen.
  6. Topper: Vogue 7975 in a navy cotton jacquard.

The challenge runs from Sept 1 to Oct 31, so I’ll hopefully be back to report on my progress before then.

Lastly if, like me, you enjoy seeing how and what other people plan for sewing a capsule wardrobe, there’s another challenge running at the same time called #mybodymodel3x3. It’s a drawing challenge to design a capsule wardrobe using paper doll cut-outs of 9 garments: 3 tops, 3 bottoms and 3 layers.

Naughty Bobbin Patterns Cookie Knit Shirt

Thursday May 7, 2020

I think I would only were collared shirts, so I’ve made quite a few button-ups. But sewing them is fraught with challenges.

  1. getting the points on the collar to to be point-y, not round, and to match each other
  2. getting the collar stand and button placket to match vertically
  3. setting in the sleeves without puckers
  4. making a neat cuff placket
  5. making straight buttonholes
  6. getting the buttons sewn on in the right place

The Cookie Shirt from Naughty Bobbin Patterns is designed to be used with knits or stretch fabric and alleviates 2 of these challenges. The collar has a non-standard construction that make the points not a problem. And, as with a knit tee, the sleeves are set in flat, so no basting and crimping to get them into a too small round armhole.

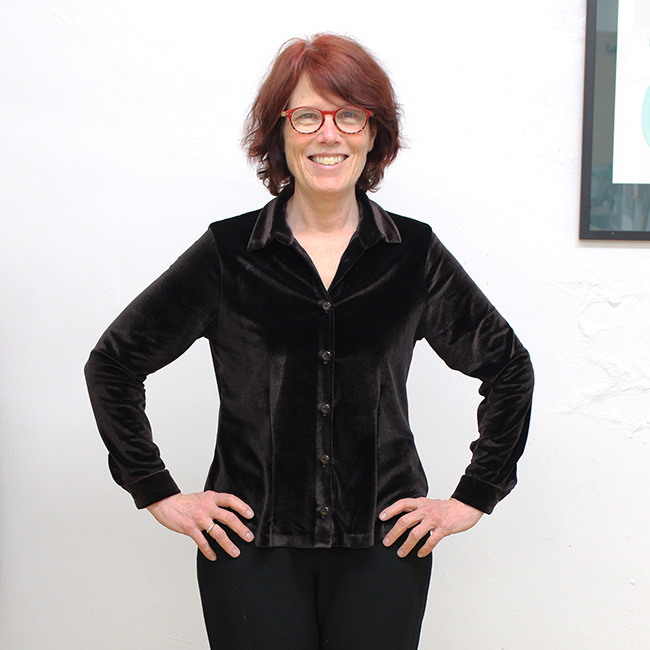
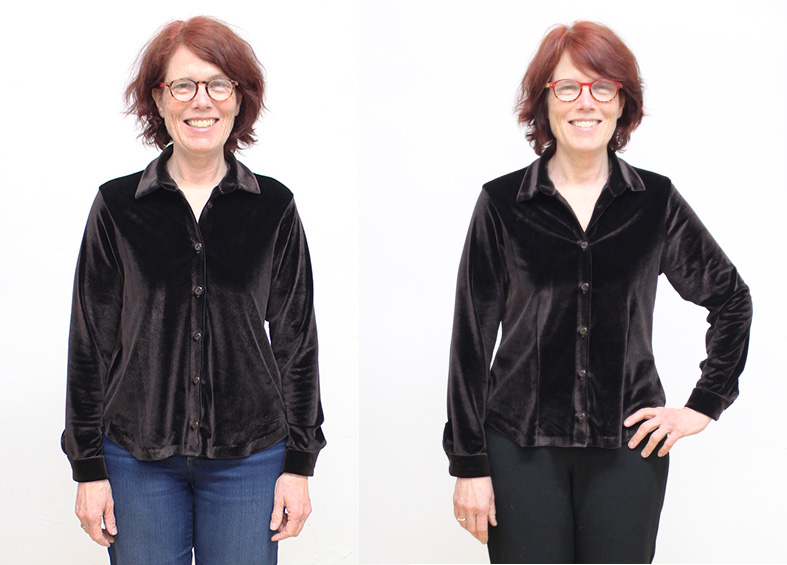
My fabric choice — a stretch velvet — isn’t ideal. It’s thick and my sewing machine didn’t like sewing it, but I’m pleased with the finished shirt.

The pattern

The PDF-only pattern comes in sizes S to XL, bust 32″-46″. It is “a knit version of the classic button-down dress shirt…featuring full length sleeves into 2” cuffs and a looser fit through the body.” There is no sew-along and the instructions are terse, much like the instructions in Burda Magazine. I wouldn’t attempt this as my first button-up shirt.

According to the size chart, I should start with the small and grade to medium at the waist and large at the hips (I’m B35 W29 H39). There are no finished measurements. So I compared my TNT woven shirt pattern to the Cookie pattern and determined a small would be fine, and probably a bit too big. So there is a lot of ease, especially though the waist and hips.

The construction

I made 2 fitting alterations — based on my TNT woven pattern, I shortened the length 4 inches, and shortened the sleeve 1 inch. Next time I would un-shorten the sleeves. I also removed the lined back yoke, thus making the back one piece. I didn’t think I’d like the velvet against my back. My fabric is quite thick and I also thought it would make the shirt bulky.

As I mentioned above, the collar construction is non-standard. It’s one long piece and sewn like a neck band on a t-shirt. This is the pattern piece below. You sew the short ends together to make a back seam, fold it in half vertically and sew the curvy edges together. The points aren’t formed by a pivoted sewing line, so when you unfold the collar, there’s no poking and prodding to get crisp corners. I’m going to adapt this to my TNT woven pattern.

Most of the seam allowances are 3/8″, except for the collar stand and collar construction, where they are 1/4″. My sewing machine hated this tiny seam allowance with the stretch velvet — no amount of pins would keep the collar stand and the shirt aligned as I sewed them (I used my walking foot and a stretch needle). After unpicking several times, I resorted to wondertape and a bit of washable fabric glue to get the job done.

The one problem I had with the instructions was the continuous lap sleeve placket — they didn’t make sense to me. My TNT woven pattern uses this same placket (a bias strip sewn around a slit in the sleeve), so I pulled out the instructions for that pattern. Sew-a-holic has a tutorial for sewing this type of placket here.

Pretty much everything else went together easily. For the hem, I used double sided fusible stay tape , just as I would on a knit tee. I attached it before I sewed up the sides of the shirt, leaving on the paper. After sewing in the sleeves and closing up the sides, I removed the paper, folded the hem up, using the edge of the stay tape as a guide, and ironed it down. I hand-sewed the hem, as I didn’t like top-stitching in the velvet.

The finished shirt

The finished shirt was really big in the front. I wore it for a day and knew I wouldn’t wear it again. There was too much fabric in front to properly tuck in the shirt and, untucked, cold air kept coming up the front. So I knew I had to make it sit closer to my body.

I took the sides in at the waist about 3/4″ on each side. That helped some but not enough. So I resorted to fish-eye darts on the front, starting below my bust, maximum at the waist, and ending at the hem. I was hesitant to put in the darts as the fabric was tricky to iron well. I put a piece of scrap velvet under the shirt when ironing and used a press cloth, but I wasn’t all that successful in getting the darts to lie flat.

Below, on the left is no darts. On the right, darts. I’m pleased with my shirt. But next time I’d use a thinner knit.

#thegreatmodulesewalong reveal

Monday March 23, 2020

Here is my entry for the #thegreatmodulesewalong challenge — 6 garments (3 tops, 2 bottoms and a topper) that all coordinate.

What I made

  1. Black wool jersey turtleneck (True Bias Nikko)
  2. Olive green wool jersey turtleneck (True Bias Nikko)
  3. Silk chiffon button-up (vogue 8772) [blog post here ]
  4. Ultra suede skirt (hack of new look 6106) [blog post here ]
  5. Black wool flannel cropped pants (Deer & Doe Narcisse)
  6. Olive boiled wool cropped jacket (Decades of Style 3’s a Charm)

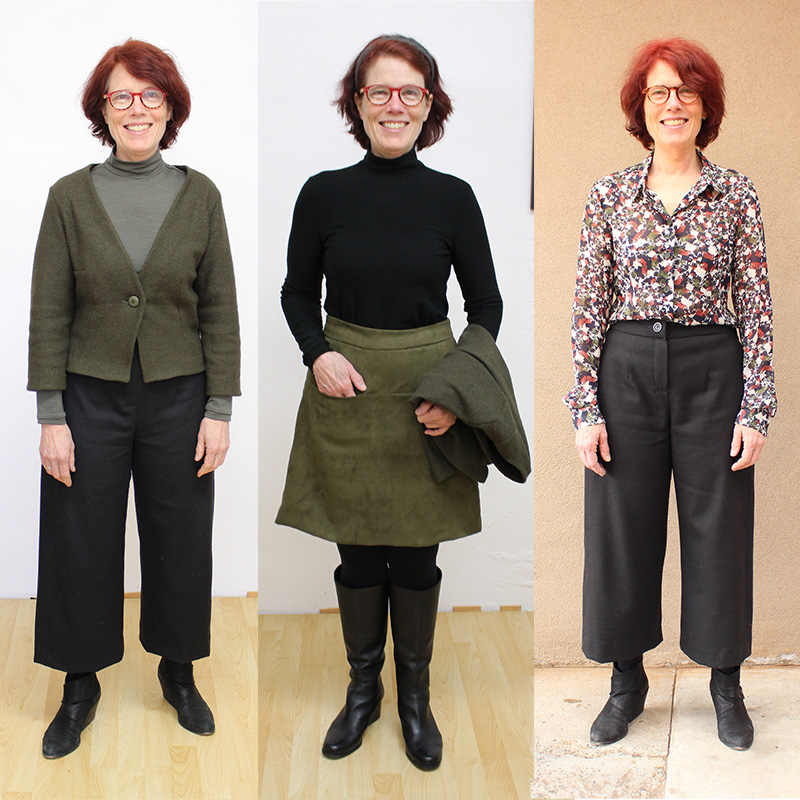
THE OUTFITS


left: Olive turtleneck, Boiled wool jacket, Black pants. center: Black turtleneck, suede skirt. right: Silk chiffon blouse, black pants


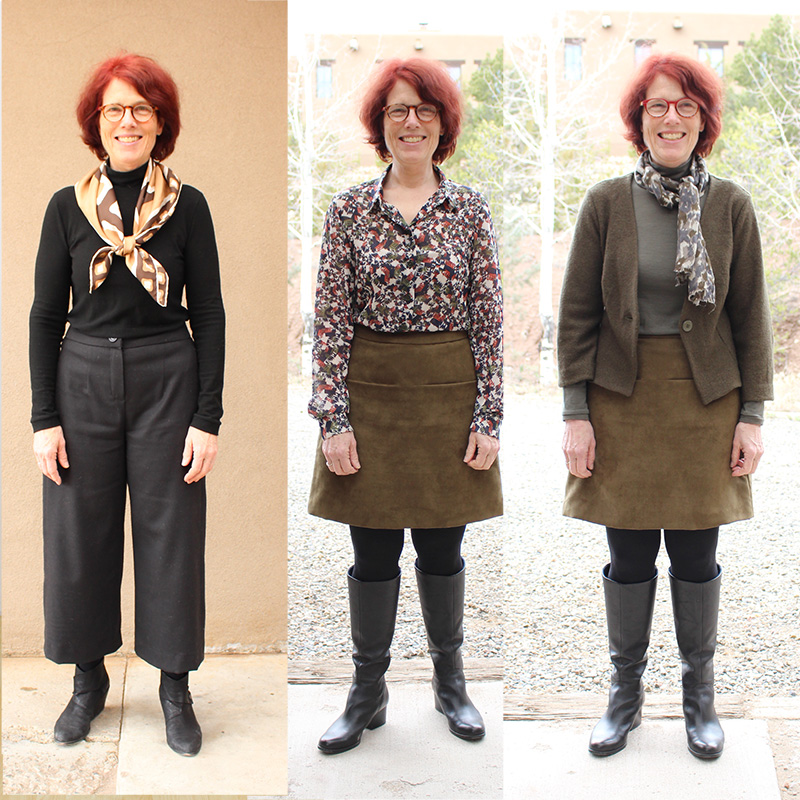
left: Black turtleneck, suede skirt. center: Silk chiffon blouse, suede skirt. right: Olive turtleneck, suede skirt, boiled wool jacket

A few comments

My biggest conundrum making this capsule was that not all olive greens go together. Actually mostly they don’t. My original plan for 2 of the tops was to use a plaid button-up I already had in my closet and some striped flannel for a second button-up. But they looked really mismatched with the jacket. I decided to substitute in a black turtleneck from a wool jersey I already had in my stash. But I had to scramble to find an appropriate fabric for my third top, as I really wanted a print. I finally found something at Mood Fabric.

I’ve worn the jacket quite a bit. It’s got a dart at the elbow, which makes the sleeves really comfortable. It’s almost like a knit cardigan. It’s such a success I’ve bought fabric to make another one.

The challenge was really fun. I didn’t get side-tracked, as I have with my Fall-Winter sewing plans, because there was a dead-line as well as lots of inspiration on Instagram.

Thanks to the hosts, Whitney (TomKatStitchery on youtube and @tomkatstitcherycarmel on instagram) and Carla (Stay Stitching on youtube and @carlamayfield5 on instagram).

Vogue 8322 review

Friday March 20, 2020

One of the garments in my Fall/Winter sewing plans is a navy blouse. I was going to use a pattern I’ve made several times before, Vogue 8772, a fitted button-up with collar & collar stand. But when I was cleaning up my sewing space, I discovered a forgotten half-done toile for a button-up with a v-neck and one-piece (camp) collar. I tried to remember why I had abandoned it — and tried it on to see how it fit.

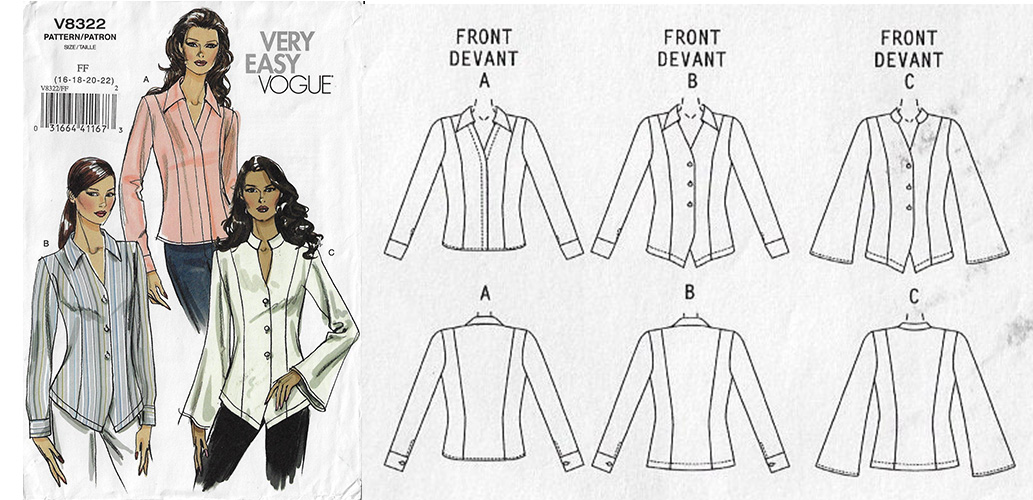
The pattern is described on the package as a long sleeve, princess seam shirt with straight or stylized front hem. View A: snap front closure, topstitched along front opening and neck edges. View B: pointed collar variation, buttoned cuff. View C: front button closure. View C: standing collar, flared sleeve. Here’s the pattern, and my toile was for view B. ( Here are the reviews on pattern review.)

I tried on the toile and saw that although I’d cut my usual Vogue pattern size (12), the chest was much too big across the front and the shoulders were too wide. I fiddled with the princess seams until I got that sorted out, took the blouse apart and made the pattern changes.

Then I cut out the pattern in my fashion fabric — a blue silk noil. It’s a pretty straight-forward sew. The collar is one piece, which is much easier than one with a collar stand, so the tricky bits were setting the sleeves and the button holes. On the front there’s a facing from center front to the princess seam which is hand-sewn to the seam allowance. That might have been the hardest part, getting the sewing smooth in that area. I clipped the seam allowance and cut it down to about 1/4″, but it still has a bit of wiggle in the seam just above my bust.

My big mistake was putting the button holes on the wrong side, but I doubt anyone but me will notice.

The V is a bit low, and if I was to make the blouse again I would figure out how to raise it up and inch or so.

My husband took several pictures, but this was the only one in focus, as I tried to get my hair to stay out of my face.

Vogue 8772 in silk chiffon

Friday March 13, 2020

This is my third and final top for the Great Module Sewalong.

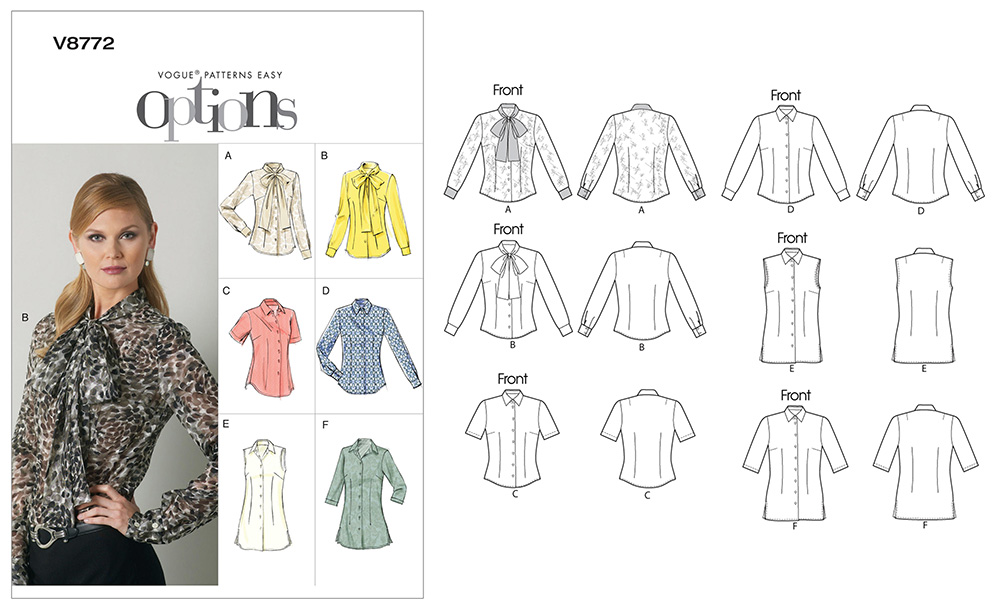
This is my sixth time making Vogue 8772 but the first using silk. Here’s the pattern. I’ve made view D with both long sleeves and no sleeves.

Vogue 8772

And here’s the fabric — a silk chiffon from Mood Fabrics.

The silk is quite thin, but soft and flow-y. In a recent Threads Magazine, there’s an article on using liquid stabilizers to treat unstable fabrics before you cut them out. One suggested stabilizer is PerfectSew. So I bought a bottle to test it out.

The Threads article says:

  1. wash & dry the fabric
  2. dip the fabric into the stabilizer and get it all wet (more on this below)
  3. roll the wet fabric in a towel to remove excess
  4. dry the fabric flat, arranging it so the grainline is straight and the fabric lies as smooth as possible.
  5. when it’s dry, iron the fabric and it’s ready to cut & sew up.
  6. after sewing, wash the finished garment by machine to get all the stabilizer out

I laid out several plastic garbage bags on the floor, and dried the wet fabric on top, as I didn’t have a surface large enough to lay the fabric flat.

But how much stabilizer to use? And the instructions on the bottle suggest diluting it if using it on garment fabric (rather than to do embroidery). But how much to dilute?

The only thing I could find on-line was a blog post by the Confident Stitch, which suggested 2 parts stabilizer to 1 part water. I tried this on a small piece of my fabric and the result was really stiff. I tried again with 1 part stabilizer to 3 parts water, and liked the results much better. The fabric was stiff but still had some drape, like a light-weight cotton.

As a happy coincidence, as I was preparing my fabric the Love To Sew Podcast had an episode on sewing with delicate fabrics. They suggested using a new micro-tex needle as well as cleaning my machine before I began sewing, so I did both those things.

Sewing the blouse wasn’t any different than the other versions I’ve made with less shifty fabric, yeah! And, bonus, I had the perfect shade of green buttons. They blend in really well so you don’t really see them.

Here’s the blouse, worn with one of the bottoms for my module.

New Look 6106 skirt with pocket hack

Tuesday March 3, 2020

The New Look 6106 skirt is one of the bottoms I’ve made for the Great Module Sewalong.

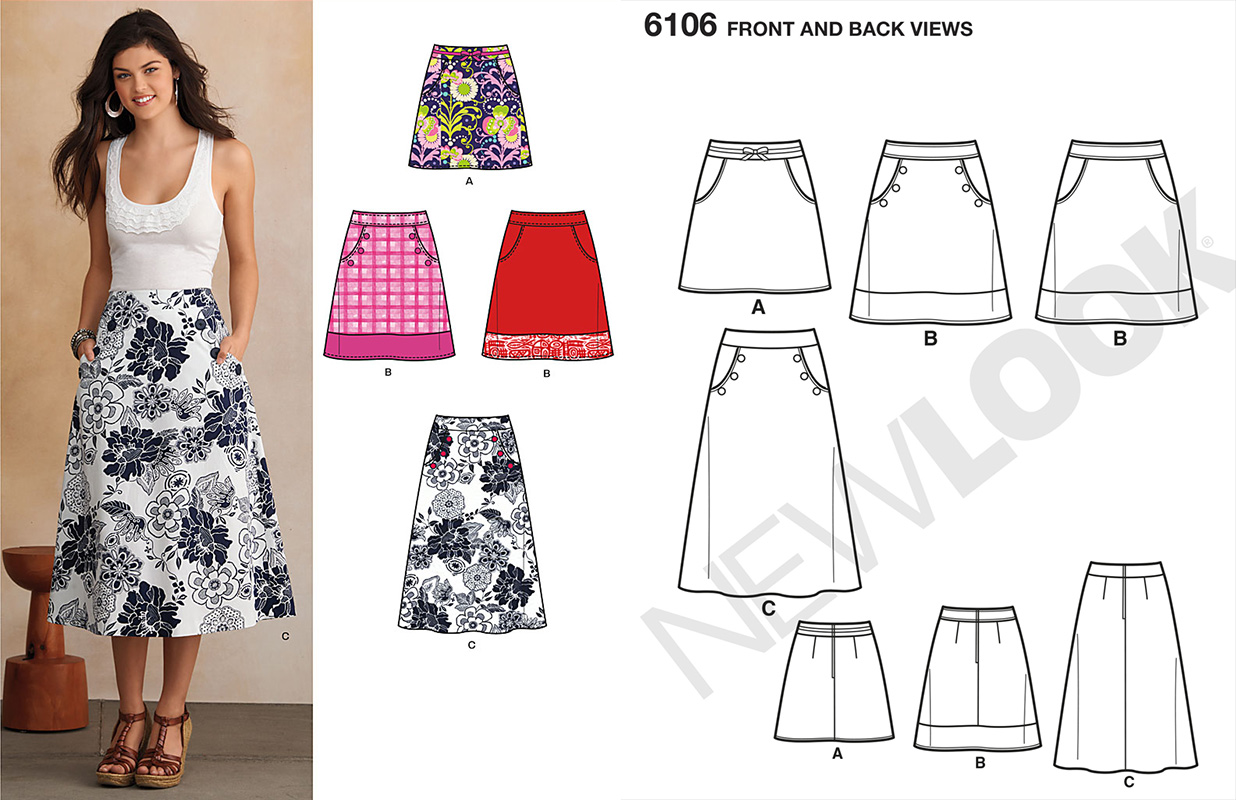
I’ve made this skirt several times, but decided quickly I didn’t like the pockets. I couldn’t get them to lie flat but the real problem was they didn’t accommodate my iphone. Here’s the pattern.

I made the skirt without the pockets, but missed them. Then I saw a Vogue sewing pattern of a Rachel Comey skirt with pockets in a horizontal seam in the front of the skirt.


Vogue 1247

It’s Vogue 1247, unfortunately out of print, but lots and lots of sewists have made it and blogged about it. There are many photos of how the pockets are attached — for instance this post by Diary of a Chainstitcher.

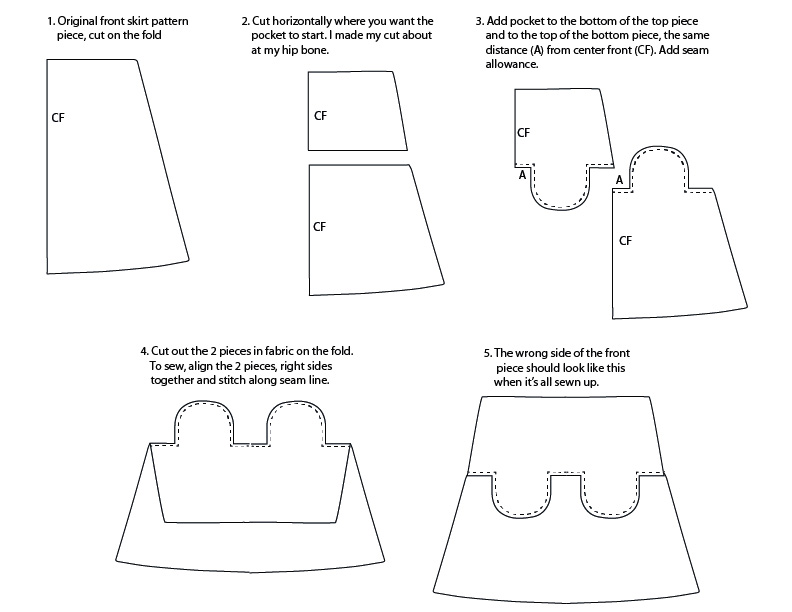
Here’s what I did to modify the pattern:

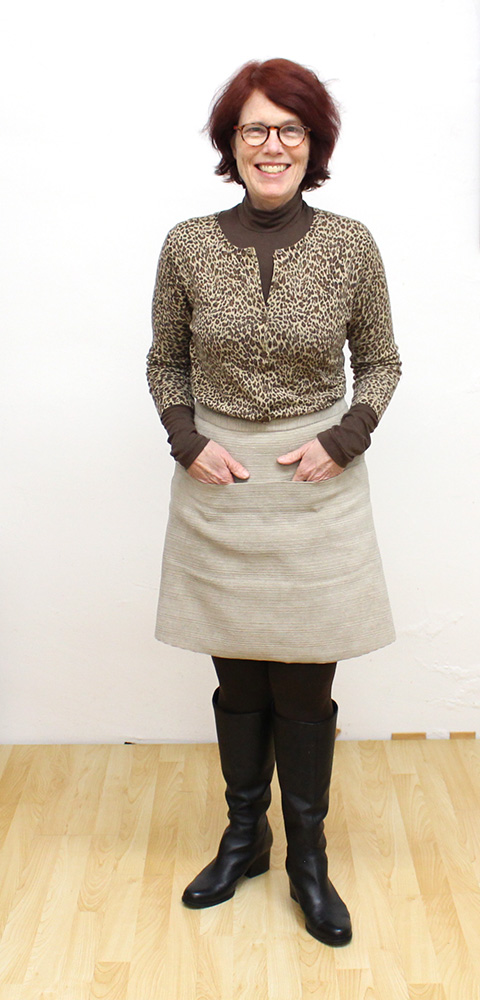
Here’s the first one I made, as a test, using a decor corduroy fabric remnant I got at Joann. As I look at the picture, I probably should have moved the pockets down a bit, but in reality I only use them for my phone, not my hands!

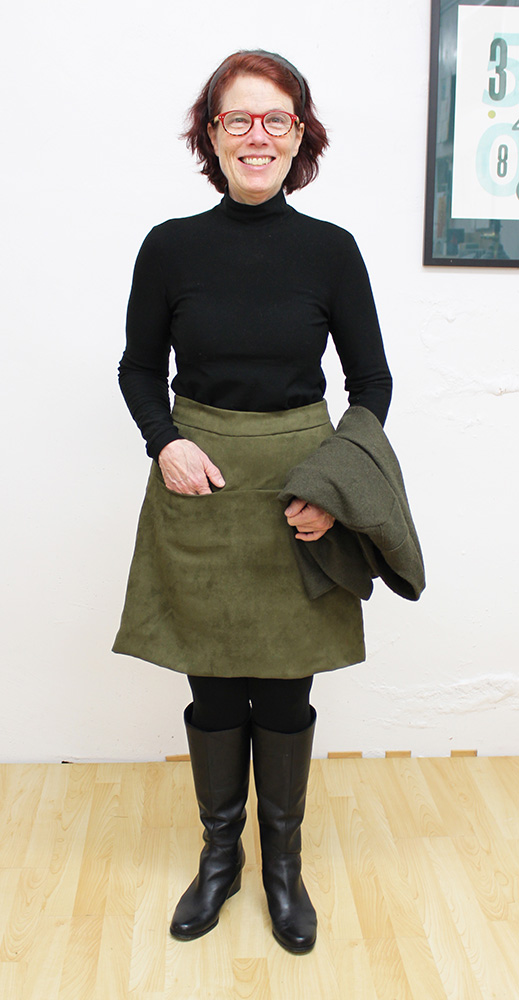
And here’s the one I made for the module sewing challenge. The fabric is an olive ultra suede from Gorgeous Fabrics. I underlined it with silk organza, so the hem wouldn’t show (I hand stitched the hem to the organza rather than the ultra suede). The suede is a bit sponge-y and the side seems didn’t lie very flat, so I also catch-stitched the seam allowance to the organza, which made them behave much better. It’s also lined, so it won’t stick to my tights.

#thegreatmodulesewalong

Monday February 24, 2020

At the end of November I put together my Fall/Winter sewing plans, excited to have pieces that would all work together. I made the first top — a True Bias Nikko Turtleneck — and realized that I needed them in all the colors. So I’ve used much of my sewing time doing just that, rather than making the other items in my list. I now have an olive turtleneck, as well as black, brown, paprika, and navy — all in heavy rotation.

I’ve made some progress with several of the other things on my list, but got stuck with a fitting failure on the pants I was hoping to make.

Then along came the Great Module Sew-along, an instagram challenge to make a small capsule wardrobe (3 tops, 2 bottoms and a topper) by the end of March. It’s hosted by Whitney (TomKatStitchery on youtube and @tomkatstitcherycarmel on instagram) and Carla (Stay Stitching on youtube and @carlamayfield5 on instagram). It’s been inspiring to watch what other sewists have planned to make, and are already making. I decided to join in, to give me a nudge to make more progress on my Fall/Winter plan.

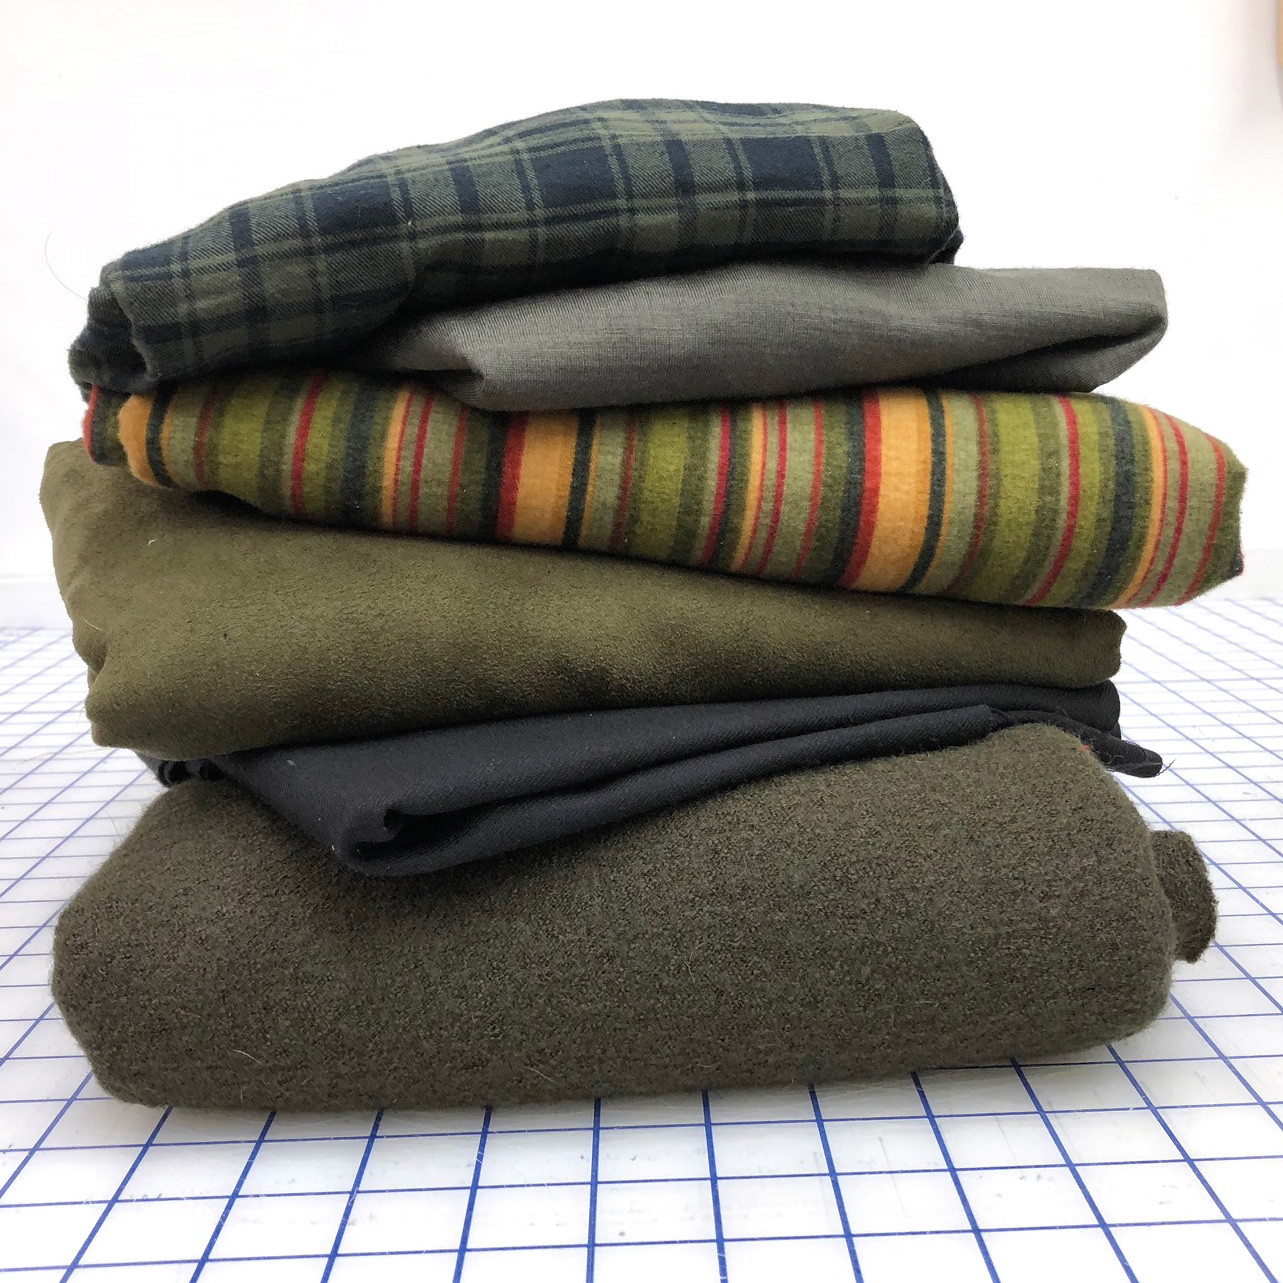
I’m modifying my original plan a bit to fit into the challenge format. They are loose with the rules, so items you’ve already made are allowed. Here’s my fabric choices

Fabric choices for The Great Module Sewalong

From the top:

  1. Flannel for a button up (vogue 8772)
  2. Wool jersey for a turtleneck (True Bias Nikko)
  3. Flannel for another button up (vogue 8772)
  4. Ultra suede for a skirt (hack of new look 6106)
  5. Wool flannel bottom weight for pants (Deer & Doe narcisse)
  6. Boiled wool for a cropped jacket (Decades of Style 3’s a charm)

I’m a bit unsure of the fabric choices for the 2 button ups — the greens aren’t quite right and I don’t know if they’ll fit under the cropped jacket. But we’ll see…

And sketches I made of the (hopefully) resulting outfits.

Sketches of my six outfits for The Great Module Sewalong