I think I would only were collared shirts, so I’ve made quite a few button-ups. But sewing them is fraught with challenges.
- getting the points on the collar to to be point-y, not round, and to match each other
- getting the collar stand and button placket to match vertically
- setting in the sleeves without puckers
- making a neat cuff placket
- making straight buttonholes
- getting the buttons sewn on in the right place
The Cookie Shirt from Naughty Bobbin Patterns is designed to be used with knits or stretch fabric and alleviates 2 of these challenges. The collar has a non-standard construction that make the points not a problem. And, as with a knit tee, the sleeves are set in flat, so no basting and crimping to get them into a too small round armhole.
My fabric choice — a stretch velvet — isn’t ideal. It’s thick and my sewing machine didn’t like sewing it, but I’m pleased with the finished shirt.
The pattern
The PDF-only pattern comes in sizes S to XL, bust 32″-46″. It is “a knit version of the classic button-down dress shirt…featuring full length sleeves into 2” cuffs and a looser fit through the body.” There is no sew-along and the instructions are terse, much like the instructions in Burda Magazine. I wouldn’t attempt this as my first button-up shirt.
According to the size chart, I should start with the small and grade to medium at the waist and large at the hips (I’m B35 W29 H39). There are no finished measurements. So I compared my TNT woven shirt pattern to the Cookie pattern and determined a small would be fine, and probably a bit too big. So there is a lot of ease, especially though the waist and hips.
The construction
I made 2 fitting alterations — based on my TNT woven pattern, I shortened the length 4 inches, and shortened the sleeve 1 inch. Next time I would un-shorten the sleeves. I also removed the lined back yoke, thus making the back one piece. I didn’t think I’d like the velvet against my back. My fabric is quite thick and I also thought it would make the shirt bulky.
As I mentioned above, the collar construction is non-standard. It’s one long piece and sewn like a neck band on a t-shirt. This is the pattern piece below. You sew the short ends together to make a back seam, fold it in half vertically and sew the curvy edges together. The points aren’t formed by a pivoted sewing line, so when you unfold the collar, there’s no poking and prodding to get crisp corners. I’m going to adapt this to my TNT woven pattern.

Most of the seam allowances are 3/8″, except for the collar stand and collar construction, where they are 1/4″. My sewing machine hated this tiny seam allowance with the stretch velvet — no amount of pins would keep the collar stand and the shirt aligned as I sewed them (I used my walking foot and a stretch needle). After unpicking several times, I resorted to wondertape and a bit of washable fabric glue to get the job done.
The one problem I had with the instructions was the continuous lap sleeve placket — they didn’t make sense to me. My TNT woven pattern uses this same placket (a bias strip sewn around a slit in the sleeve), so I pulled out the instructions for that pattern. Sew-a-holic has a tutorial for sewing this type of placket here.
Pretty much everything else went together easily. For the hem, I used double sided fusible stay tape , just as I would on a knit tee. I attached it before I sewed up the sides of the shirt, leaving on the paper. After sewing in the sleeves and closing up the sides, I removed the paper, folded the hem up, using the edge of the stay tape as a guide, and ironed it down. I hand-sewed the hem, as I didn’t like top-stitching in the velvet.
The finished shirt
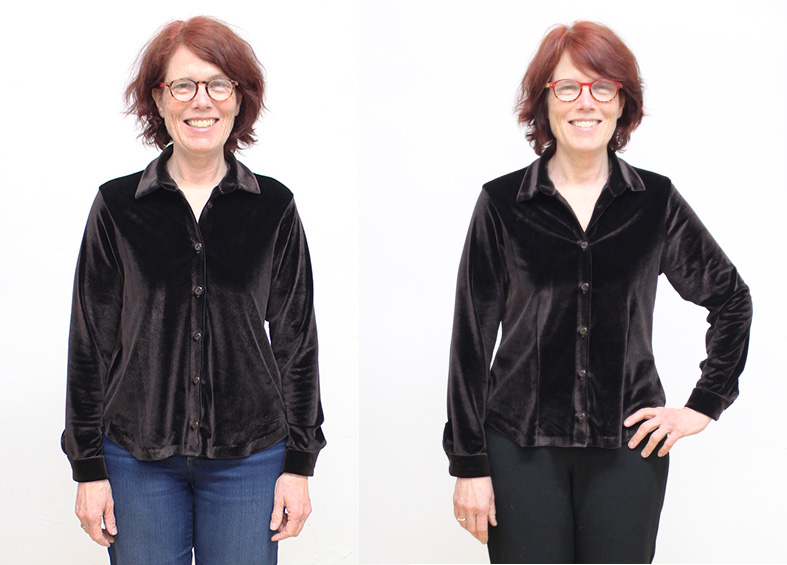
The finished shirt was really big in the front. I wore it for a day and knew I wouldn’t wear it again. There was too much fabric in front to properly tuck in the shirt and, untucked, cold air kept coming up the front. So I knew I had to make it sit closer to my body.
I took the sides in at the waist about 3/4″ on each side. That helped some but not enough. So I resorted to fish-eye darts on the front, starting below my bust, maximum at the waist, and ending at the hem. I was hesitant to put in the darts as the fabric was tricky to iron well. I put a piece of scrap velvet under the shirt when ironing and used a press cloth, but I wasn’t all that successful in getting the darts to lie flat.
Below, on the left is no darts. On the right, darts. I’m pleased with my shirt. But next time I’d use a thinner knit.