Since I started garment sewing in the fall of 2017, I’ve tried unsuccessfully to put together a seasonal sewing plan. I tried the Seamwork “Design your wardrobe” online course. I tried the yearly Make Nine challenge. I drew sketches and made lists. But in the end I couldn’t decide on a list or plan, much less stick to it. Ultimately I suspect I wasn’t ready to commit to a plan, as I wasn’t confident of my sewing abilities. But this fall I realized I actually had a plan, I just hadn’t articulated it. I looked at the fabric I bought recently and saw lots of olive green. I’ve been trying to make coordinating pieces that mix and match, and I noticed that the sketches I drew were of complete outfits — bottom, top, top layer and jacket/coat.
I wondered if I could combine those outfits into a plan or a mini capsule wardrobe. As someone who loves puzzles, I returned to something I’d tried before but abandoned — a wardrobe sudoku. The idea is to create a “sudoku” board of 4 rows and 4 columns with each row containing one top, bottom, accessory, and shoes to create an outfit. You end up with 10 outfits using 16 pieces (reading the rows, columns and 2 diagonals). Pattern Review had a sudoku contest and you can see what people made here. And here’s an explanation of how the sudoku wardrobe works.
In fall, winter and spring, I wear a top, a cardigan, a bottom, and, on errands and my afternoon walk, a jacket or coat. I don’t wear many accessories — jewelry or scarves, and my shoes are boring — sneakers when there is no snow and boots when there is. Since I’m interested in making/sewing, I decided on 4 categories I could make: top, bottom, top layer and jacket.
I knew that sewing 16 items wasn’t realistic for me, plus I wanted to make the outfits work with things that are already in my closet. So I picked 8 things to make, and 8 things I had already made or bought. I also wanted to pick both patterns I’ve made before as well as a few I haven’t, and to vary the complexity — easy knit tops and more time consuming button ups and coats. Here’s the grid, and below a list of the items. The cells in the grid with the yellow-ish background are things I’ve already made or bought.
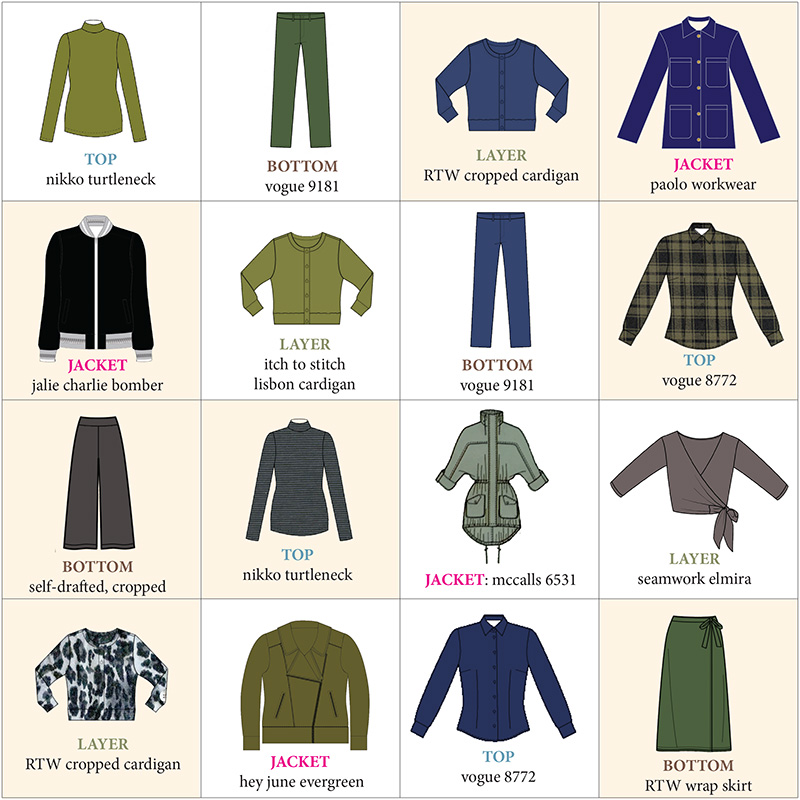
Tops:
- True Bias Nikko Turtleneck in olive wool jersey. I’ve made this top several times, so no fitting necessary. And a quick sew!
- Vogue 8772 button up in green/black plaid flannel. I made this shirt last year and wear it often with black jeans, but would like to have it work with other things in my closet
- True Bias Nikko Turtleneck in black/grey stripe wool jersey. I made this one earlier this fall.
- Vogue 8772 button up in navy. Since I’ve already made this pattern multiple times, there’s no fitting. But it is time consuming with collar and button & sleeve plackets (not to mention getting the sleeve head to fit nicely!)
Bottoms:
- Vogue 9181 pants in olive green stretch twill: I haven’t had a lot of luck fitting pants — the back on the patterns I’ve attempted are a mass of wrinkles. But this pattern has 3 backs — so I’m hoping the curvy one will be more successful.
- Vogue 9181 pants in a stretch denim: see above.
- Self-drafted cropped black culottes. I took a pants fitting class last year, and these are the results — they are comfortable and since they are cropped they stay out of the snow when I run errands!
- Ready to wear midi wrap skirt in loden (dullish grey green). I really like this skirt but don’t wear it enough.
Layers:
- Ready to wear cropped navy cardigan.
- Itch to Stitch Lisbon Cardigan in olive wool jersey. I’ve made this sweater before, so no fitting required, and mostly sewn on my serger (well, there are button holes!)
- Seamwork Elmira wrap cardigan in black jersey. I’d like to have a few layers that aren’t standard button up cardigans. This is a new pattern for me.
- Ready to wear cropped animal print grey/black cardigan. I’m not sure this goes with the other things in my grid, but I don’t wear this enough so thought I would give it a boost.
Jackets:
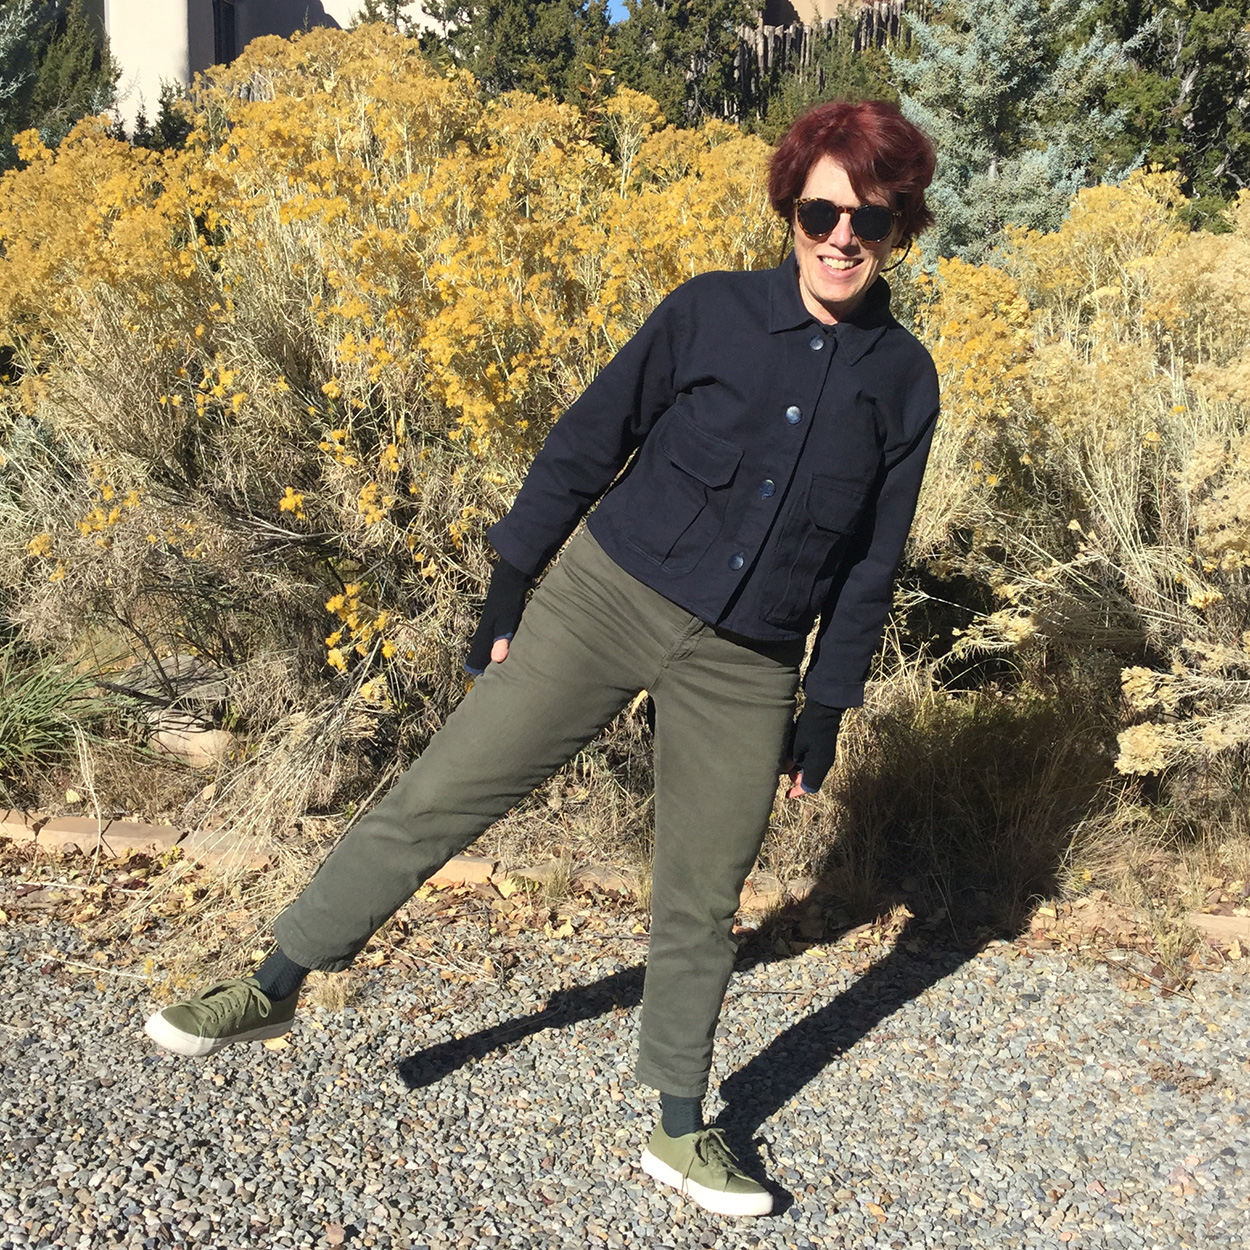
- Paola workwear jacket in navy denim. Made this fall — blog post here.
- Jalie Charlie Bomber Jacket in quilted black ponte, made earlier this year. Blog post coming.
- Mccall’s 6531 anorak in olive green twill with red zipper: This anorak is the most involved make on my list. It’s unlined, but realized after getting all the materials together that I really need a warmer jacket. So I’ll be lining this one.
- Hey June Evergreen Moto Jacket in olive green sweater knit. This is a new pattern for me.
First up is the Seamwork Elmira wrap top. Do you have sewing plans for this fall/winter?